Building a custom PC is a great experience, but after a few years, dust can build up inside. For those who want to clean their custom PC, this article explains the best methods for cleaning a custom-built PC.
When dust accumulates, it can cause decreased performance, increased fan speed and noise, and in the worst case, short circuits or even fire. Regular cleaning is essential for PC maintenance.
Cleaning a custom PC is not very difficult, and the cleaning process usually takes about 30 minutes to 1 hour. Try it when you have some free time.
- Recommended cleaning frequency: once every 6 months to 1 year
- Dust buildup can cause reduced performance, noise, and even fire in rare cases
- Essential cleaning tools: screwdriver, air duster, cleaning brush
- Cleaning is easier if done on a balcony or in a home parking lot
Select PC parts and online stores to instantly generate an estimate, check compatibility, and calculate power requirements. You can save up to five different builds, making it easy to try out multiple configurations.
≫ Tool:PC Parts Estimation & Compatibility Check Tool
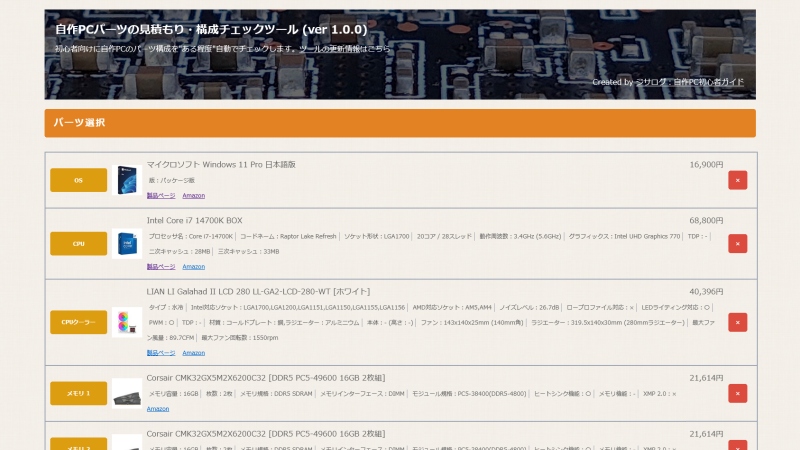
Table of Contents
- 1 About Cleaning a Custom PC
- 2 Tools Needed for Cleaning a Custom PC
- 3 Preparation Before Cleaning a Custom PC
- 4 How to Clean a Custom PC
- 5 How to Clean PC Peripherals
- 6 Precautions When Cleaning a Custom PC
- 7 Other Useful Knowledge for Cleaning a Custom PC
- 8 Summary: Clean Regularly to Use Your Custom PC Longer!
About Cleaning a Custom PC
Before cleaning a custom PC, this section explains the basics such as how often to clean and what happens if dust accumulates.
Recommended Cleaning Frequency: Once Every 6 Months to 1 Year!
The recommended cleaning frequency for a custom PC is about once every 6 months to 1 year.
Custom PCs have many fans and ports like USB, which easily collect dust, so regular cleaning is necessary.
How much dust builds up depends on factors like the amount of fabric items (blankets, curtains), how long the PC is used, and the amount of airflow (number and speed of fans).
Because of this, it’s hard to say exactly how often to clean, but cleaning about once every 6 months to 1 year is a good rule of thumb.
However, even with this frequency, a lot of dust can still accumulate. If several years have passed since purchase and the PC has never been cleaned, it could be risky.
Use the amount of dust on the PC’s filters or fans as a guideline for when to clean.
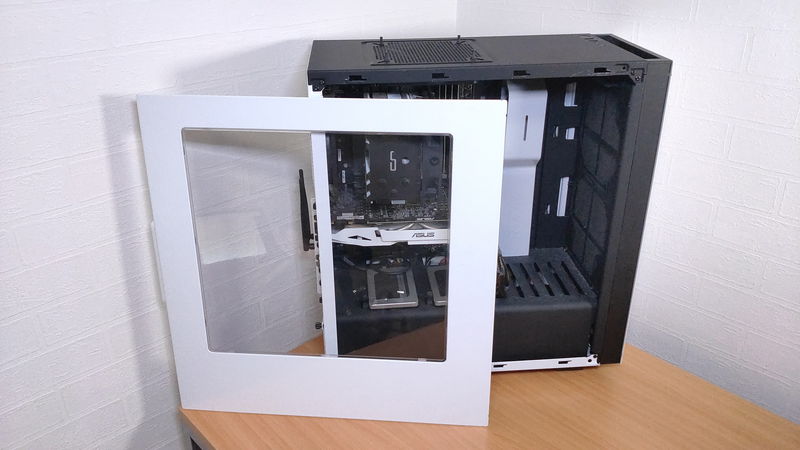
If the inside of the PC is visible through tempered glass, check the fans, motherboard, and the bottom of the case for dust buildup.
Here are some photos of my custom PC to help you judge when to clean.
At this level, it’s like, “Maybe it’s okay for a bit longer…” or “I’ll clean it when I have time.”
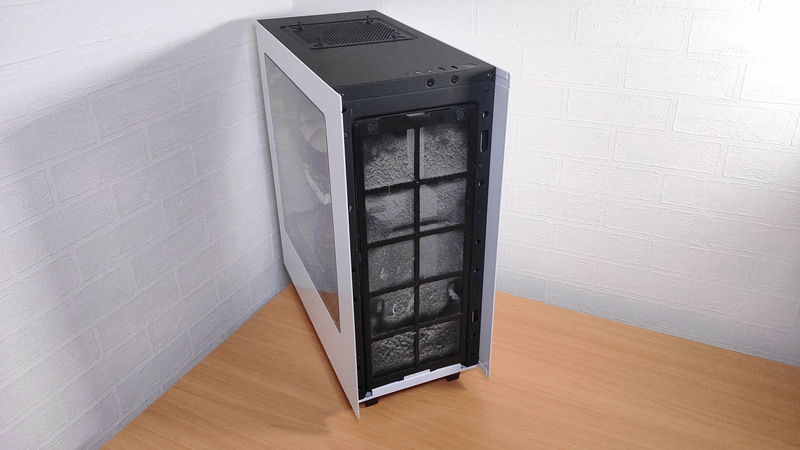

If the filter or the bottom of the PC case looks like this, it’s time to clean.
Also, if dust is visibly building up on the fans or circuit boards, it’s time to clean. Judging by the amount of dust on the filters and fans, this is the line where cleaning should be done soon.
Keyboards also tend to collect dust, and if eating near the PC, food crumbs can get inside, making it dirtier than expected. Removing keycaps and cleaning thoroughly is recommended about once every 6 months to 1 year, but for light cleaning like wiping or using an air duster, once every 2 weeks to 1 month is fine.
Not Cleaning Causes Performance Drops and Noise
Problems caused by dust inside a custom PC include:
- Decreased performance
- Fan noise
- Short circuits and fire due to dust (very rare)
Decreased Performance
When dust builds up, airflow inside the PC worsens, reducing cooling performance.
Poor cooling leads to lower overall PC performance.
The CPU and GPU generate the most heat, especially during high-load tasks like 3D gaming. PCs have functions to adjust performance to prevent dangerous temperatures.
If airflow is poor and cooling is not effective, the CPU and GPU will temporarily lower their performance to keep temperatures down, causing performance drops.
![]() Ken
Ken
Fan Noise
Besides lowering performance, PCs also increase fan speed to improve cooling.
Higher fan speed means more noise.
Short Circuits and Fire Due to Dust (Very Rare)
It’s rare, but if a PC hasn’t been cleaned for 10 years and is used under heavy load, dust can cause short circuits and even fires.
I have used both desktop and laptop PCs for over 20 years, and even with 24/7 heavy use, I have never had a fire or malfunction. Proper cleaning prevents these issues.
Sometimes, when replacing or adding PC parts with dust present, dust can get into connectors and cause a burning smell.
![]() Ken
Ken
Where Dust Accumulates: Filters, Fans, and More
Dust tends to build up in these areas:
- PC case filters
- Fans (case, CPU, GPU, power supply)
- Mouse
- Keyboard
Dust easily collects in areas with airflow, like case fans, CPU, GPU, and power supply fans.
![]() Ken
Ken
Filters in front of fans also collect dust. Some PC cases have filters, but even with filters, fans still get dusty, so cleaning is necessary.
Mouse wheels and button gaps can collect dust and grime. Keyboards have many gaps where dust and hair can get in, especially if eating snacks while using the PC.
![]() Ken
Ken
Tools Needed for Cleaning a Custom PC
Before starting, here are the tools needed for cleaning a custom PC.
Some tools are essential, while others are just helpful. Prepare what is needed.
Screwdriver: Needed for Disassembly
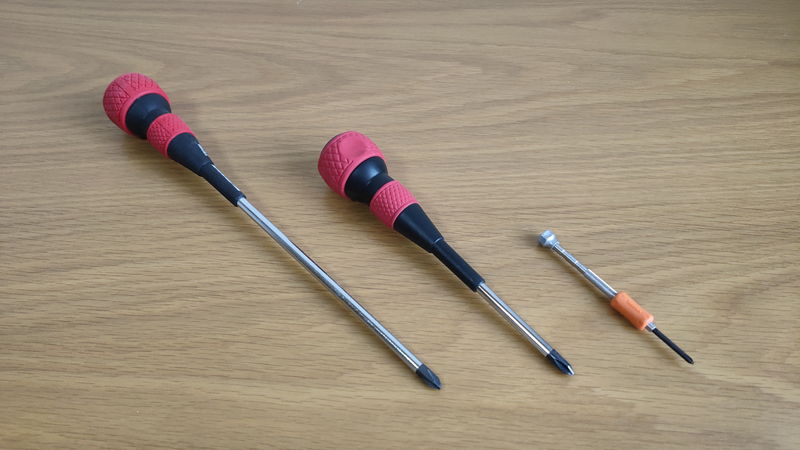
A screwdriver is needed to remove the side panel for cleaning inside a custom PC.
The two screwdrivers on the left in the photo are fine. The rightmost one is for small screws like NVMe SSDs, but not usually needed for cleaning.
Try using a regular screwdriver at home first, and if it doesn’t fit, consider buying one.

Air Duster: Blows Away Dust
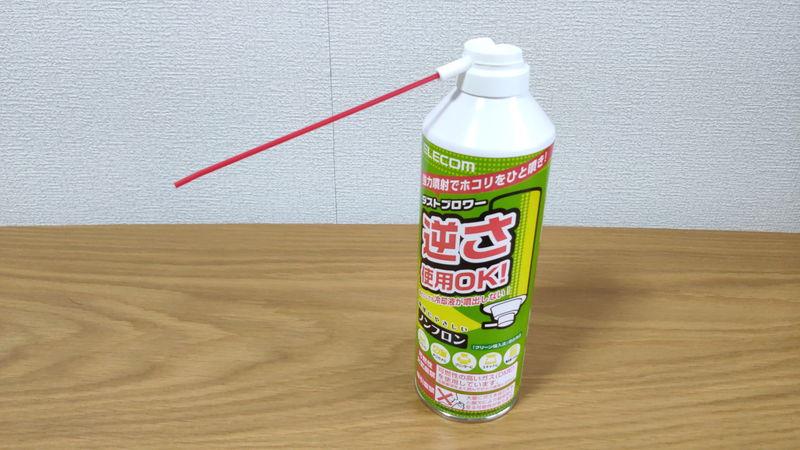
I use about half a can per cleaning, so if cleaning multiple PCs, prepare enough cans.
There are also rechargeable electric air dusters, but they often have low air pressure and don’t blow dust well, so they are not recommended.

When it comes to air dusters, Elecom is a well-known PC accessory brand. This is recommended.
![]() Ken
Ken
Cleaning Brush: For Small Areas
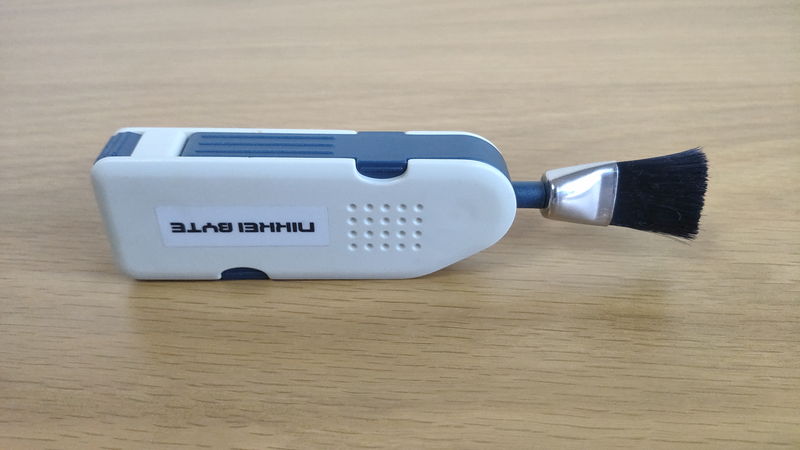
A PC Cleaning brush is used to clean keyboard gaps, ports, fans, and vents.
It’s best to have both a soft and a stiff brush, or a set with both types.
Do not use brushes on circuit boards.
Use the soft brush for general dust, and the stiff brush for stubborn spots.

Cotton Swabs or Sticks with Tissue
Cotton swabs or sticks wrapped with tissue or cloth are useful for cleaning fans.
Air dusters can’t remove all dust, so for a deeper clean, wiping is necessary.
Depending on the brush shape, it may be fine, but for deep areas like inside fans, long thin tools are helpful.
Again, avoid using these on circuit boards.
Cloth: For Cleaning Monitors

A ELECOM Cleaning Cloth KCT-007 Ultra Strong Microfiber is used for cleaning monitors, similar to those used for smartphones or glasses.
Compared to tissue, the fibers are finer and less likely to scratch, making it ideal for monitors.
Dry tissue or cloth may not remove oily fingerprints, but a cloth can clean them well.
Anhydrous Ethanol (Alcohol): For Removing Grime

It’s not essential, but convenient to have.
If dirt is hard to remove, people tend to breathe on it or use a damp cloth, but moisture is not good for electronics.
However, anhydrous ethanol evaporates quickly, making it suitable for cleaning PCs.
![]() Ken
Ken

Vacuum Cleaner: For Cleaning Up Blown Dust
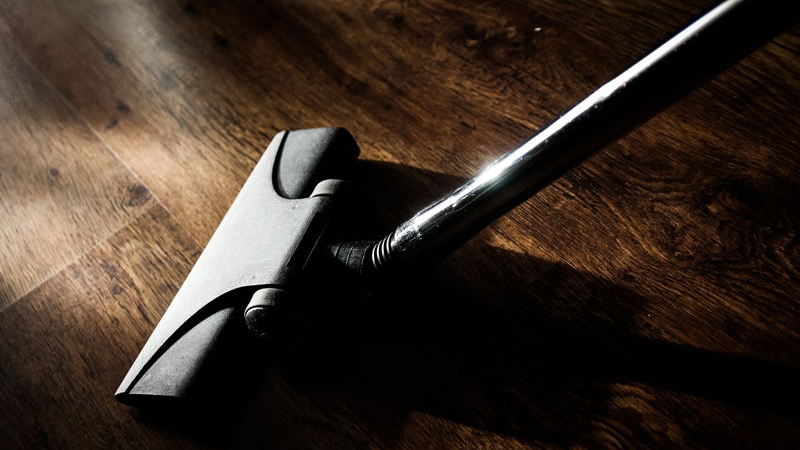
It’s best to clean a custom PC on a balcony or in a parking lot where dust can fly, but if cleaning indoors, a vacuum cleaner is needed to clean up dust blown into the room.
Preparation Before Cleaning a Custom PC
Here are the steps to prepare before cleaning a custom PC.
Back Up Data
There is a small chance that cleaning could cause damage, so always back up important data first.
In the worst case, cleaning could cause a malfunction, so make sure your data is safe.
Turn Off the PC and Unplug Cables
Before cleaning, always turn off the custom PC and unplug the power cable.
Even after unplugging, capacitors can hold electricity for a while, so wait 5 to 10 minutes before cleaning.
Usually, electricity dissipates in a few seconds to a few minutes, so waiting this long is safe.
Cleaning while electricity remains can risk electric shock or igniting the flammable gas in air dusters, so always wait.
This may sound scary, but with normal cleaning, you won’t touch circuits or PC parts, so electric shock is unlikely.
I have sometimes cleaned right after unplugging, and never had a fire or malfunction.
![]() Ken
Ken
The risk is very low, but for safety, wait a few minutes after unplugging to avoid electric shock or fire.
Choose a Cleaning Location (Outdoors is Best)
Air dusters are usually used for cleaning custom PCs.
Dust will fly, so consider where to clean.
If cleaning indoors, the room will need to be cleaned afterward.
If possible, clean outdoors on a balcony, parking lot, or porch.
Dust will blow away in the wind, and any remaining dust can be swept up easily.
I have a balcony at home, so I lay something down to keep my feet clean. The material in the photo is Amazon packaging.
If you can’t clean outside, you’ll have to clean indoors. In that case, prepare a vacuum cleaner for the dust.
![]() Ken
Ken
How to Clean a Custom PC
Next, here are the steps and methods for cleaning inside a custom PC.
Follow these steps in order for smooth cleaning.
First, clean the filters and port holes that don’t require opening the side panel.
Filters often have a lot of dust, so clean them before opening the side panel to avoid getting dust inside the PC.
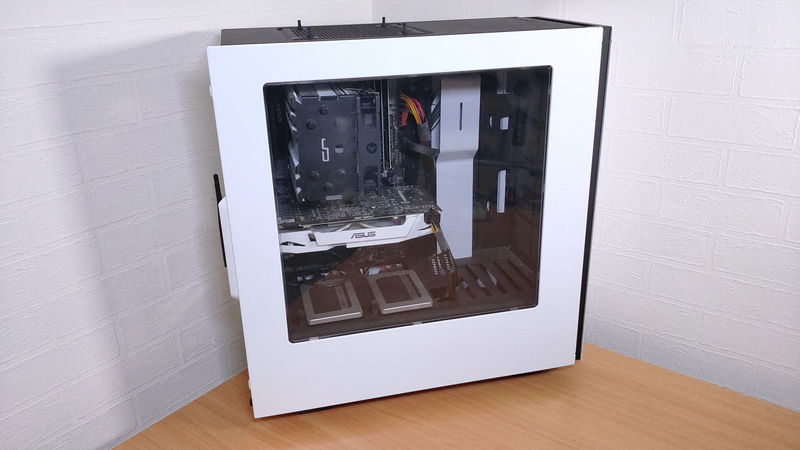
Then, open the side panel and clean the inside.
Clean the bottom of the PC case last, as dust from other areas will settle there.
Finally, reattach the side panel and wipe the exterior.
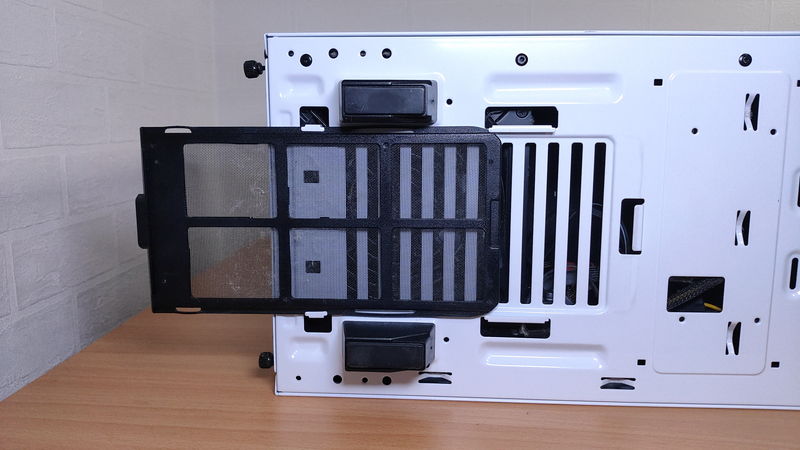
Cleaning the Filters

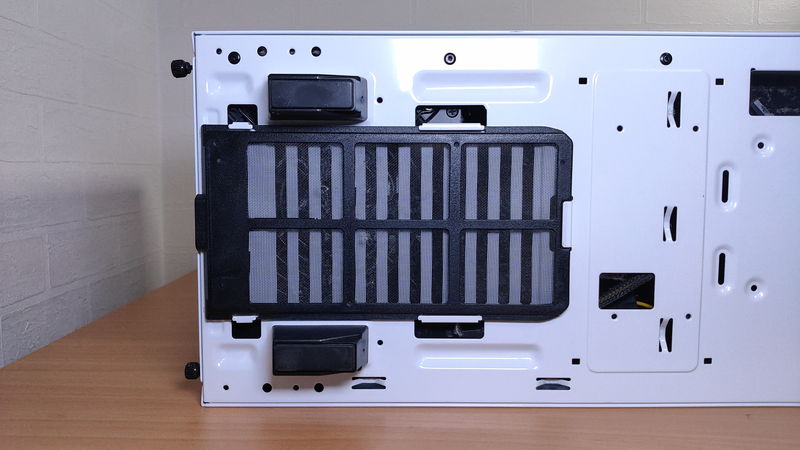
Filters prevent dust from entering the PC and are usually in front of fans.
- Front case fan area
- Top case fan area
- Power supply fan area
Filters are usually easy to remove from the outside, so remove the filter and clean it with a vacuum or by tapping it outside.
Clean filters as you would air conditioner filters.
![]() Ken
Ken
Cleaning USB and Other Ports
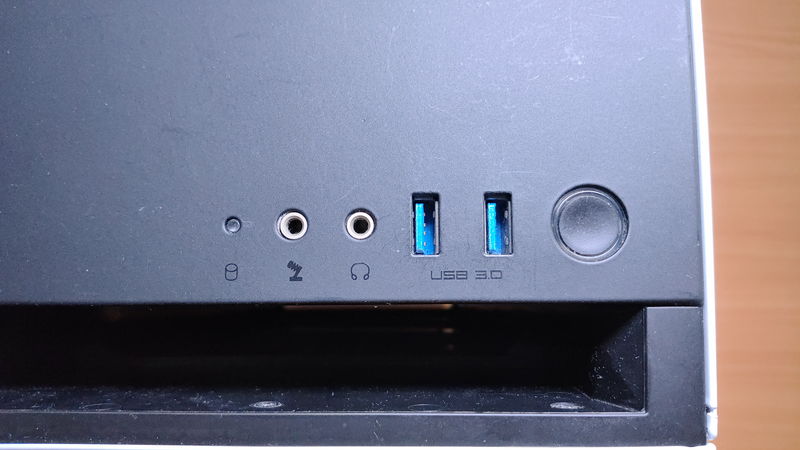
Front ports
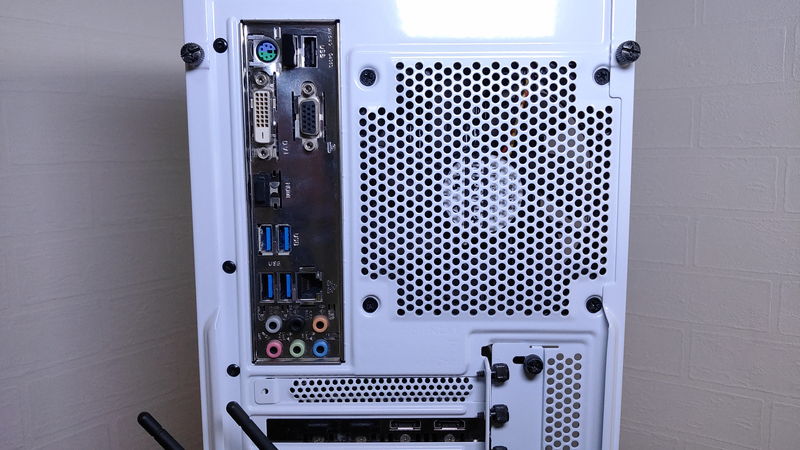
Rear ports
Custom PCs have many ports like USB and video outputs, which easily collect dust.
To clean these, use an air duster to blow out the dust.
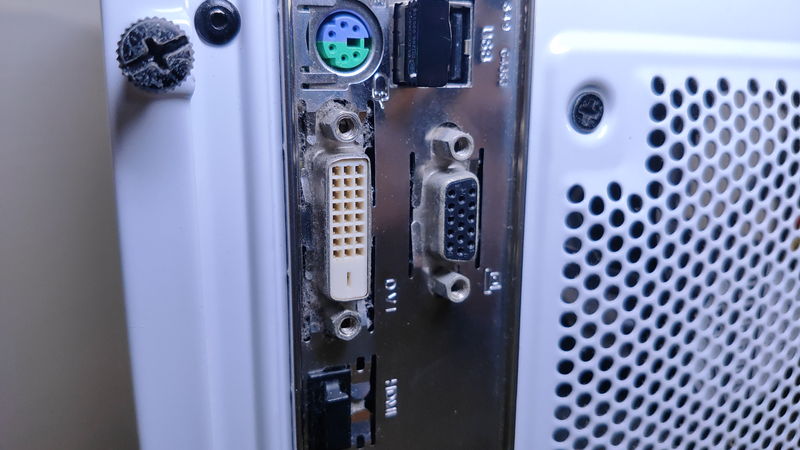
A lot of dust can build up like this.
If clumps of dust remain, use a cleaning brush to remove them. Be gentle to avoid damaging the ports.
Some ports have gaps, so dust may be pushed inside the PC. In that case, clean the inside later.
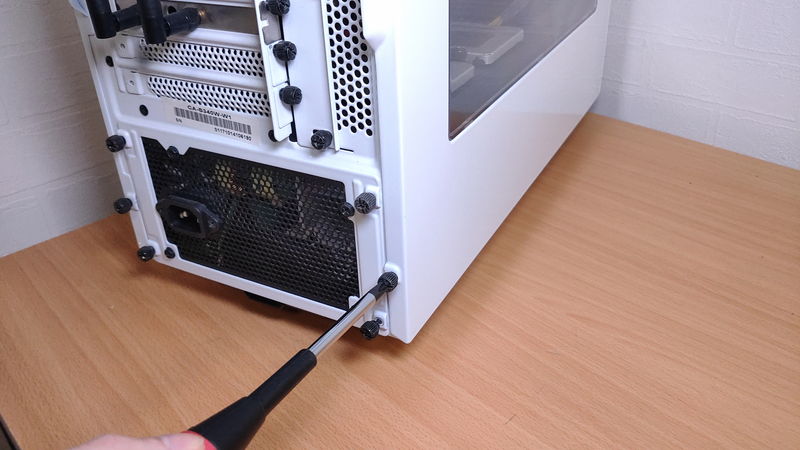
Opening the Side Panel
Now, remove the side panel to clean the inside.
The side panel is usually screwed on from the rear. Remove the screws to open it.
There are usually two screws on each side at the back, for a total of four. Use a Phillips screwdriver to remove them, then slide the panel back and pull it off.
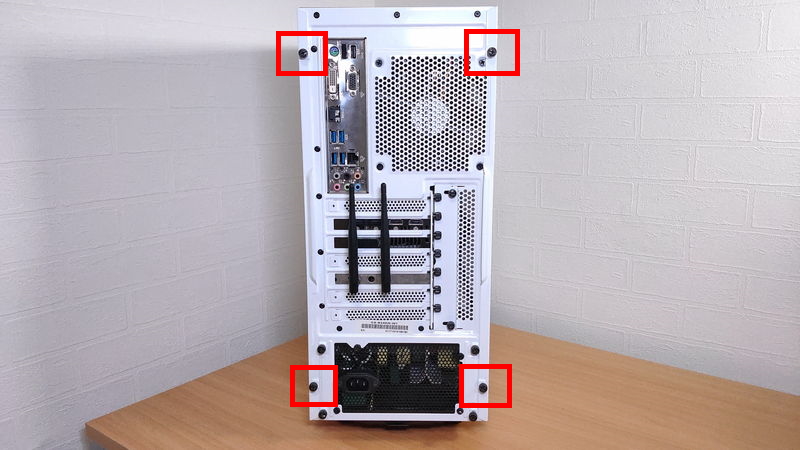
Remove the four screws at the corners of the rear of the custom PC.
There are other screws for case fans and the power supply, so don’t remove the wrong ones.
Slide the panel toward the back of the PC, then pull it off.
Some cases have tool-less panels or tempered glass with screws in different places, so check your case.
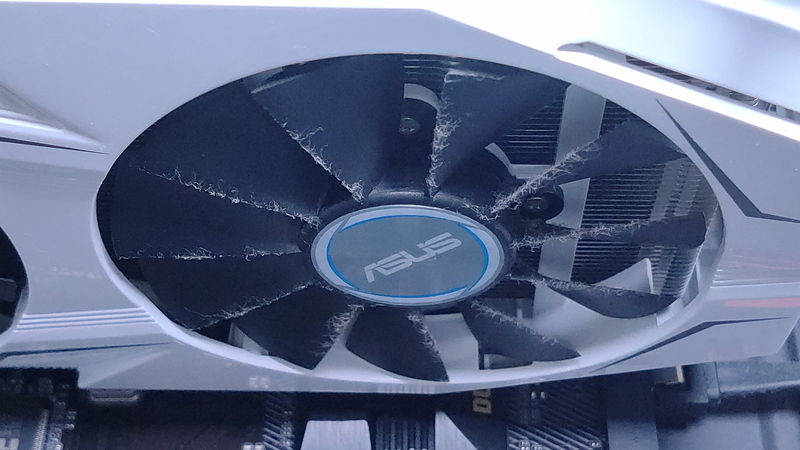
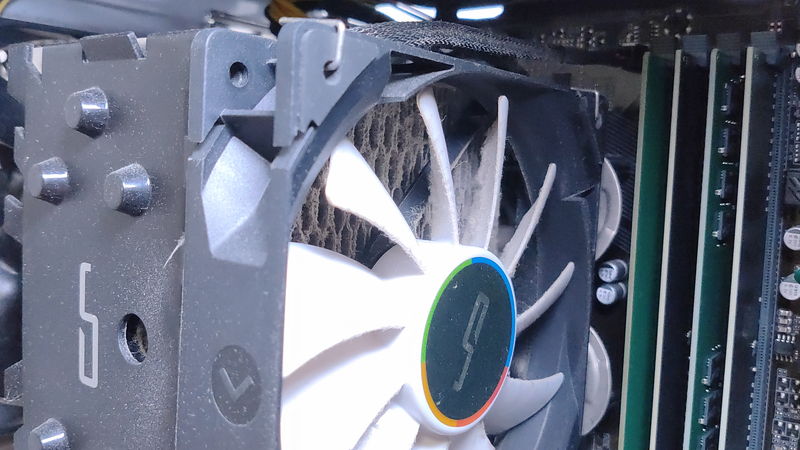
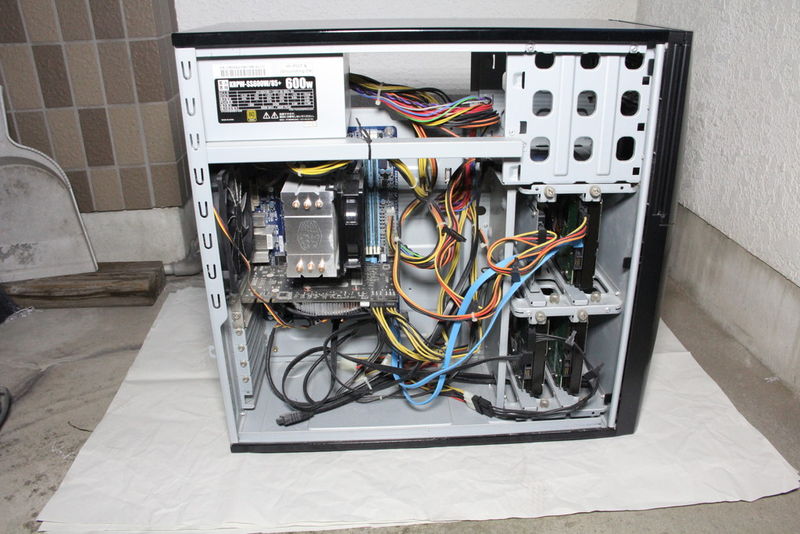
Cleaning CPU Cooler, GPU, and Case Fans
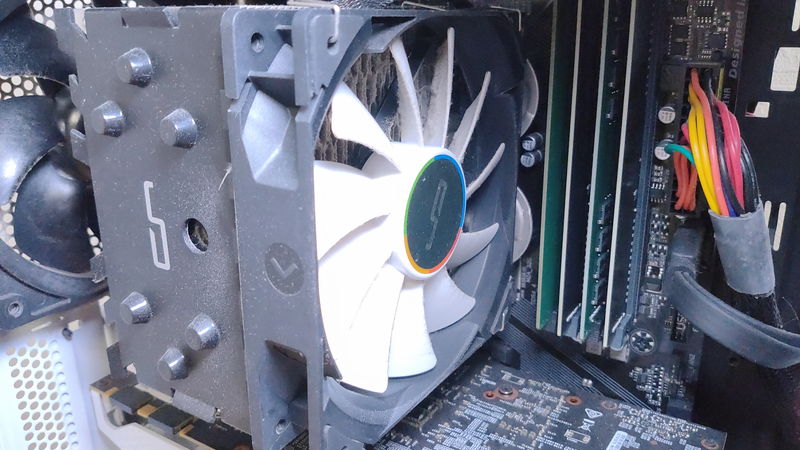
CPU cooler fan
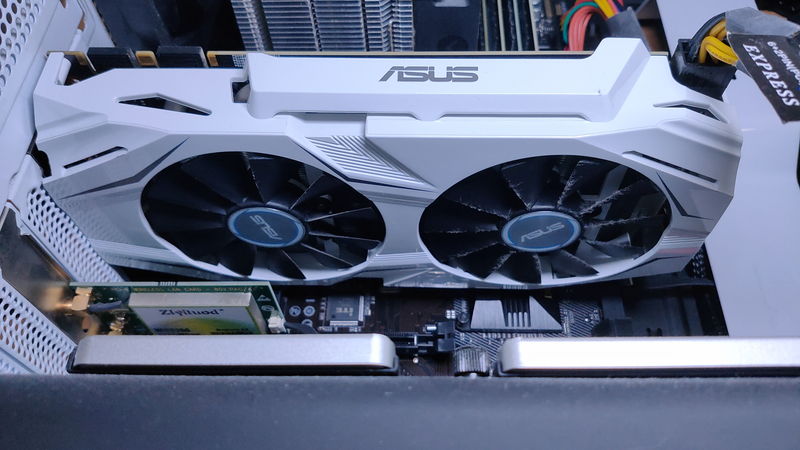
GPU fan
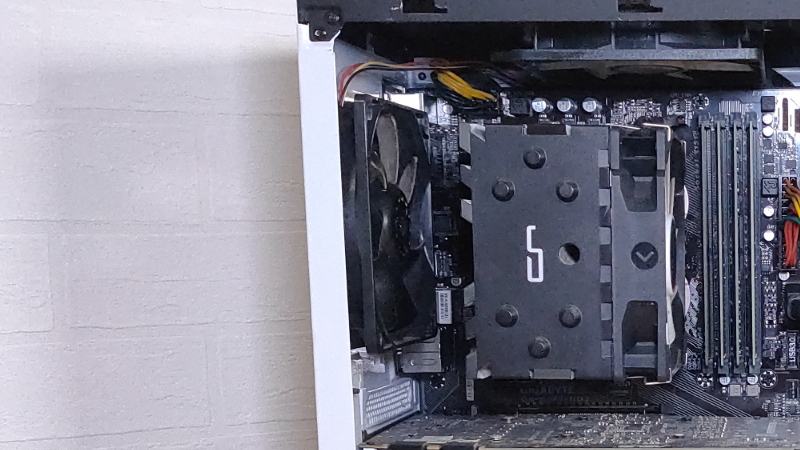
Case fan
CPU coolers and GPUs have fans for cooling, and the PC case usually has 2-3 fans for airflow. These fans easily collect dust.
First, use an air duster to blow away large dust.
Then, use a cotton swab or a stick/tissue to wipe off remaining dust.
Hold the center of the fan to keep it from spinning while cleaning.
Cleaning the back of the fan is difficult, so just do what you can. As long as most dust is removed, cooling and performance will not be affected.
Cleaning the Power Supply Unit
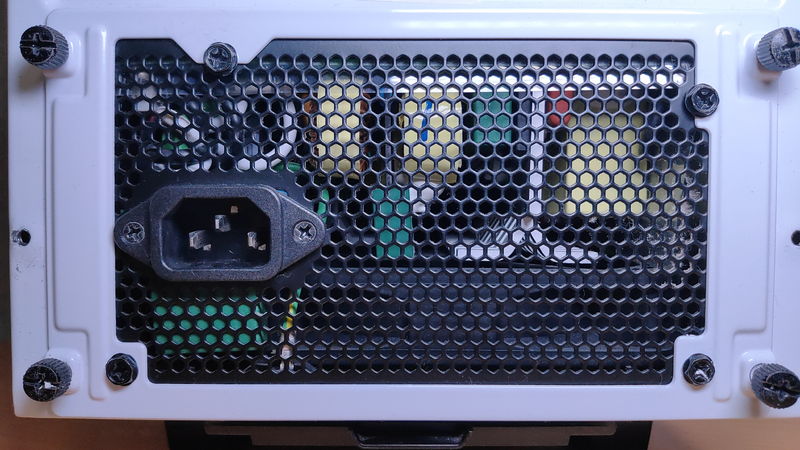
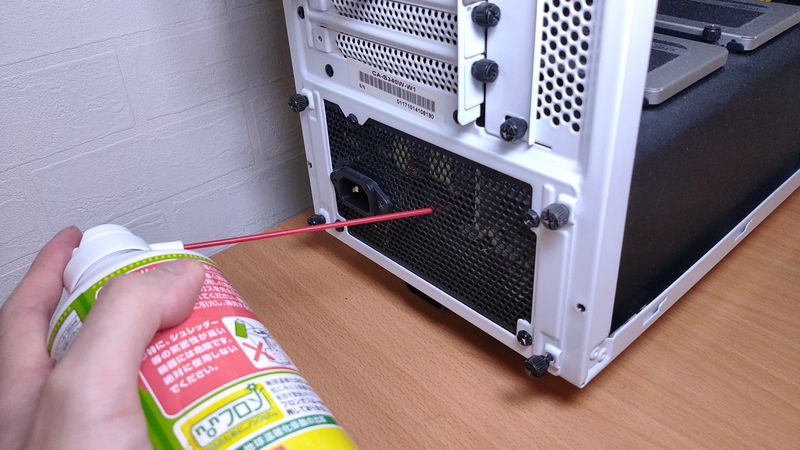
The power supply unit also has a fan and collects dust. Inside, there are many small parts like capacitors, making it complex and prone to dust.
To clean, use an air duster on the fan and inside components to blow out dust.
Use the thin straw attachment to reach inside.
Be careful not to force the straw inside, as the small parts can break. Do not push too hard.
Only clean as far as you can without touching internal parts.
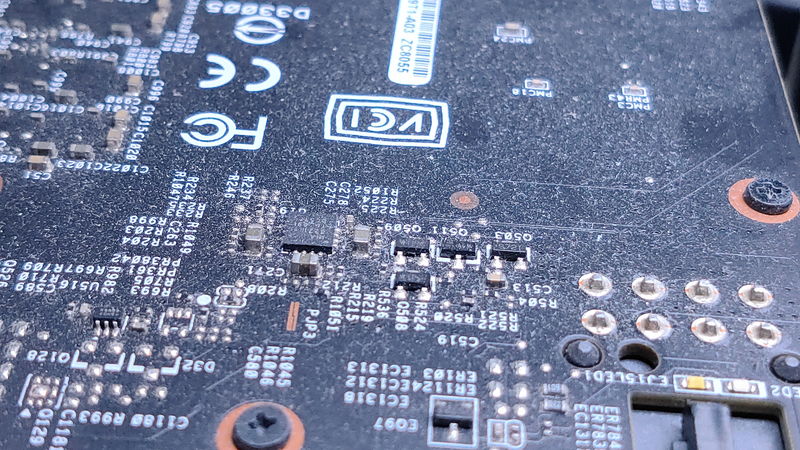
Cleaning Other Circuit Boards
Before air duster

After air duster
Motherboards and graphics cards also collect dust.
For these, just use an air duster to blow off the dust.
Even after using an air duster, some dust may remain. Do not use cotton swabs, cloths, or brushes on circuit boards.
As shown in the photos, there are many tiny chips, and wiping can leave fibers or cause damage.
Custom PCs are durable, but touching boards just to remove dust is risky.
If most dust is removed, a little remaining dust is fine. It won’t affect cooling, performance, or noise.
Cleaning the Bottom of the PC Case

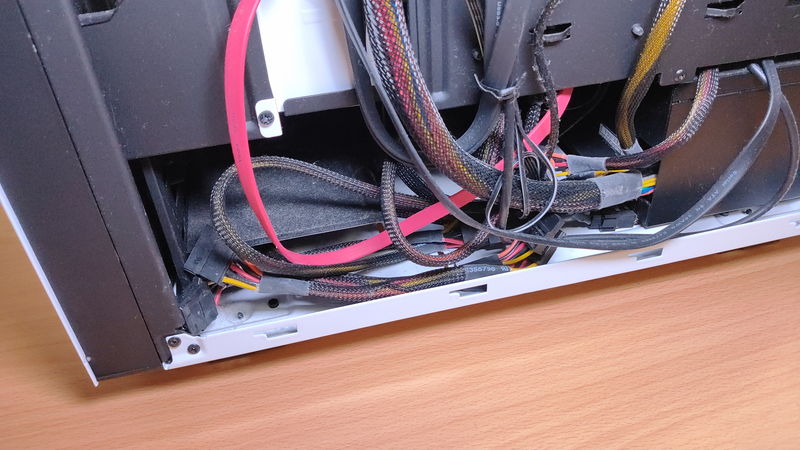
Finally, clean the bottom of the PC case.
Most dust will settle here after cleaning fans, power supply, and boards.
Wipe with tissue or cloth. You can use an air duster, but wiping is better to avoid dust resettling.
Air dusters use flammable gas, so wait about 30 minutes after cleaning for the gas to dissipate before closing the case and turning on the power.
In rare cases, gas could ignite from electricity, so do not turn on the PC immediately after cleaning.
Check the air duster’s instructions about residual gas.
I usually wait about 10 minutes before turning on the PC and have never had a problem. As long as you wait a bit, there’s no need to worry.
This completes cleaning the inside of the custom PC. If you cleaned indoors, clean the room as well.
![]() Ken
Ken
Cleaning the Exterior and Body
Finally, wipe the PC body with a cloth. If you have anhydrous ethanol, use it for cleaning.
How to Clean PC Peripherals
Here are simple cleaning methods for PC peripherals.
Cleaning the Mouse
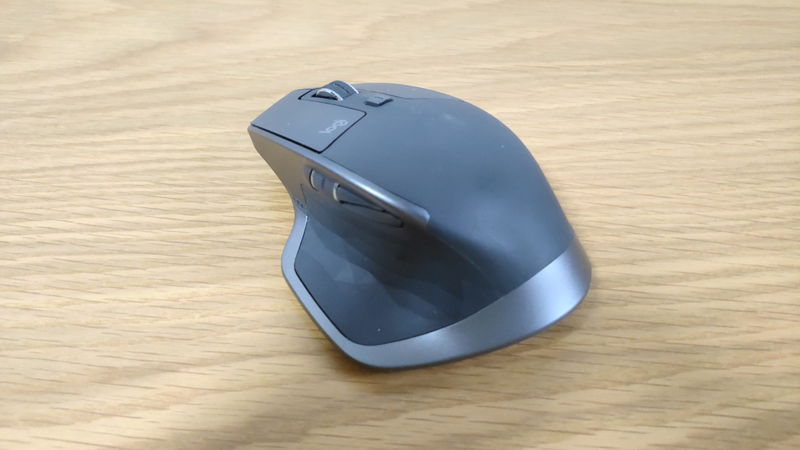
First, remove the mouse cable or battery to avoid electricity. For rechargeable mice, this is not necessary.
Clean the mouse by removing dust with a brush or tissue, then wipe off fingerprints and grime.
Dust and grime often build up on the thumb area, click buttons, rubber underside, mouse wheel, and gaps.
If dirt is hard to remove, use ethanol on a tissue. If the optical sensor is dirty, wipe gently with tissue.
Mouse wheels with bumps get dirtier, so clean them thoroughly.
Cleaning the Keyboard
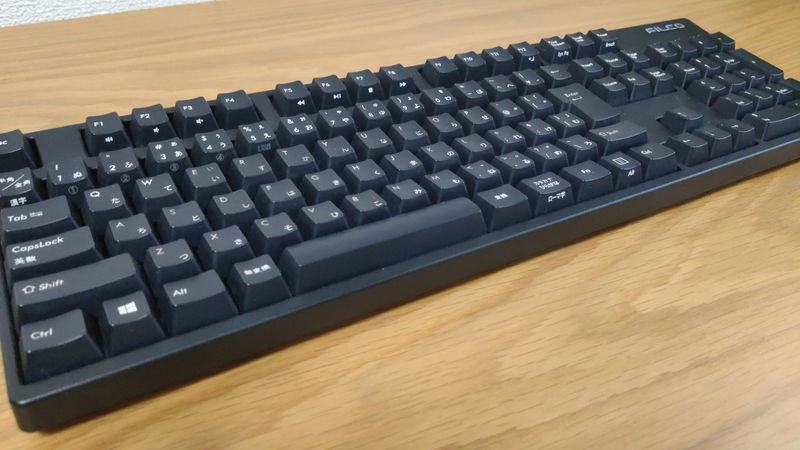
Like the mouse, remove the keyboard cable or battery.
Turn the keyboard upside down and shake or tap it over a trash can to remove debris.
After removing large debris, use an air duster to blow out dust. Insert the nozzle between keys to reach inside.
Use a brush or cotton swab to clean dust that the air duster can’t remove.
Finally, wipe the surface with tissue to remove skin oils.
Cleaning the Monitor
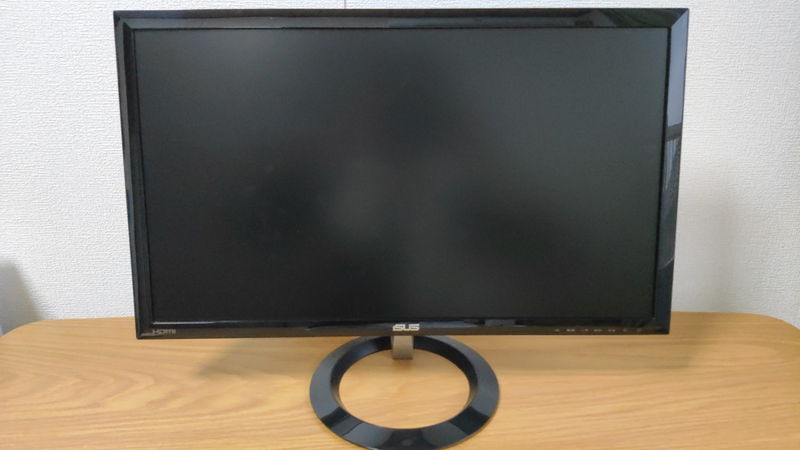
Dust collects under the monitor bezel, in gaps, and on the back ports. Use an air duster for these areas.
Wipe the stand with tissue.
Wipe the monitor screen with a cloth. If skin oils remain, use ethanol on the cloth.
Finally, wipe the whole monitor lightly.
Precautions When Cleaning a Custom PC
Here are some important precautions for cleaning a custom PC.
Do Not Use Wet Cloths
Custom PCs are delicate electronics and weak to moisture, so do not use wet cloths.
It’s true that fingerprints are hard to remove without moisture. In that case, use a cloth dampened with anhydrous ethanol.
![]() Ken
Ken
Beware of Static Electricity
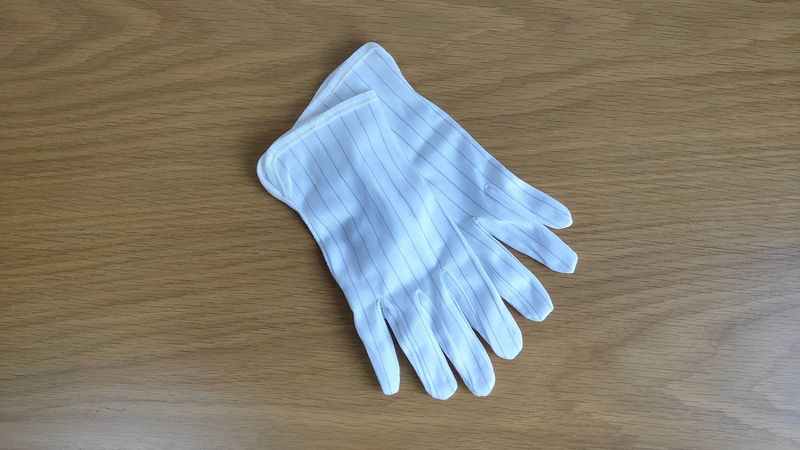
Custom PCs are sensitive to static electricity, so discharge your hands before cleaning.
Touch a metal doorknob or similar to discharge static from your hands.
![]() Ken
Ken
If you are still worried, use anti-static gloves.

Other Useful Knowledge for Cleaning a Custom PC
Here are some other useful tips for cleaning a custom PC.
Professional Cleaning Services Are Available
For those who find cleaning a custom PC troublesome, some PC makers offer cleaning services.
- Dospara: PC Internal Cleaning Service (from 4,000 yen incl. tax)
- PC Kobo: PC Cleaning Service (from 4,000 yen incl. tax)
![]() Ken
Ken
Since these are PC makers, professionals will handle the cleaning.
Summary: Clean Regularly to Use Your Custom PC Longer!
This article explained the preparations, tools, areas, and steps needed to clean a custom PC.
Here are the key points again:
- Recommended cleaning frequency: once every 6 months to 1 year
- Dust buildup can cause reduced performance, noise, and even fire in rare cases
- Essential cleaning tools: screwdriver, air duster, cleaning brush
- Cleaning is easier if done on a balcony or in a home parking lot
If a PC is used without cleaning, dust buildup can lower CPU and GPU performance, and increased fan speed for cooling can cause noise.
To avoid this, clean at least once every 6 months to 1 year.
If the PC is not kept in optimal condition, parts may wear out faster. Regular cleaning is recommended for long-term use.
Select PC parts and online stores to instantly generate an estimate, check compatibility, and calculate power requirements. You can save up to five different builds, making it easy to try out multiple configurations.
≫ Tool:PC Parts Estimation & Compatibility Check Tool