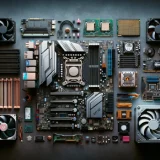

Want to try building a custom PC, but worried about making mistakes…
Building a custom PC is not an easy task for beginners, but if solid knowledge is acquired in advance and the process from selecting parts to assembly and operation check is understood, it will not feel as difficult.
Recalling the first time building a custom PC, the impression was it wasn’t as hard as expected, but calling it easy is an exaggeration.
It is quite possible to make irreversible mistakes, such as choosing parts with incompatible standards or damaging components during assembly.
Therefore, the key to successfully building a custom PC is to gain solid knowledge, use parts warranties if worried, and patiently research anything unclear.
This article explains in detail the key points and tips to avoid failure when building a custom PC.
- Building a custom PC can fail without prior knowledge
- Failure may lead to being unable to assemble or extra costs for repurchasing parts
- With correct knowledge, it is not especially difficult
- Parts selection, wiring, and troubleshooting are challenging in custom PC building
- At the very least, know the “irreversible” failure points
![]() Ken
Ken
Select PC parts and online stores to instantly generate an estimate, check compatibility, and calculate power requirements. You can save up to five different builds, making it easy to try out multiple configurations.
≫ Tool:PC Parts Estimation & Compatibility Check Tool
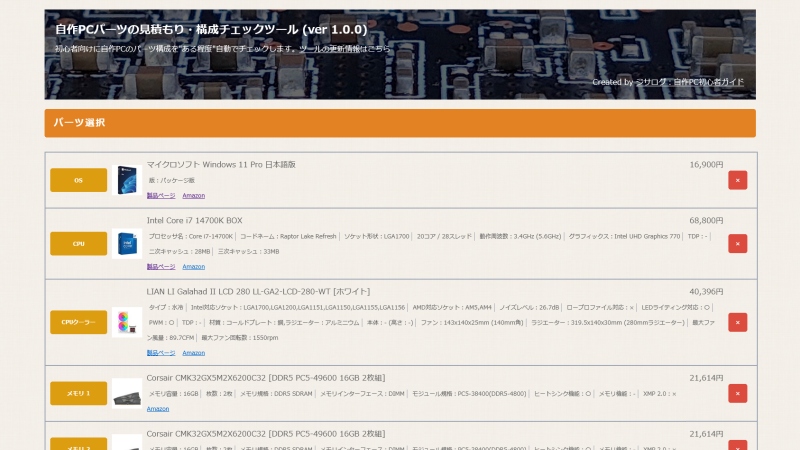
Table of Contents
- 1 Is Building a Custom PC Easy or Difficult?
- 2 The Process and Difficult Points of Building a Custom PC
- 3 [Irreversible] Failure Points in Custom PC Building
- 3.1 Buying Parts with Incompatible Standards Like CPU Sockets
- 3.2 Parts Not Fitting in the PC Case Due to Size Mistakes
- 3.3 BIOS Version Incompatibility
- 3.4 Insufficient Power Cable Length or Quantity
- 3.5 Damaging Parts During Assembly
- 3.6 Damaging Parts with Static Electricity
- 3.7 Bending CPU or CPU Socket Pins
- 3.8 Forgetting to Remove Protective Film from CPU Cooler, GPU, or M.2 SSD Heatsink
- 4 [Reversible] Failure Points in Custom PC Building
- 4.1 Insufficient Memory Insertion
- 4.2 Incorrect Memory Slot Placement
- 4.3 Injuring Hands When Installing the PC Case Back Panel
- 4.4 Incorrect Fan Orientation
- 4.5 Wiring Mistakes
- 4.6 Receiving a Defective Part
- 4.7 Installing the OS on the Wrong Drive
- 4.8 Using the Motherboard Video Output When a GPU Is Installed
- 5 Tips to Avoid Failure When Building a Custom PC
- 6 Summary: Beginners Can Do It If They Study Well in Advance!
Is Building a Custom PC Easy or Difficult?
Building a custom PC may be difficult without knowledge, but if the necessary information is learned well, it is not such a complicated task.
First, remember these two important points about custom PCs.
Without Prior Knowledge, You May Get Stuck
Getting stuck means that the combination of purchased PC parts cannot be assembled, resulting in a level of failure where parts need to be repurchased.
Depending on which and how many parts need to be repurchased, the cost will change, but in any case, additional expenses from several thousand to tens of thousands of yen will be required.
There are several points in custom PC building where mistakes in part selection must absolutely be avoided.
For example:
- The CPU and motherboard socket types must match.
- The memory and motherboard memory slot standards must match.
- The motherboard must be compatible with the PC case standard.
Therefore, if a motherboard with a socket type that does not match the CPU is chosen, assembly is physically impossible due to the different shapes.
If compatibility between parts is mistaken like this, assembly becomes impossible and repurchasing is necessary.
If a PC part does not work due to initial defects, returns, refunds, or exchanges are possible, but exchanges due to compatibility mistakes are generally not supported.
Repurchasing some parts means the already purchased parts become wasted, and new expenses of several thousand to tens of thousands of yen are needed, which is a big loss.
To avoid this, it is necessary to thoroughly learn about custom PCs in advance.
With Correct Knowledge, It Is Not Especially Difficult
Surprisingly, it’s not that hard…
It was too difficult and I couldn’t assemble it…
Looking at people trying custom PC building on blogs, X, or YouTube, some succeed without problems, while others fail due to the difficulty of assembly.
However, most people who could not assemble it seem to lack knowledge.
Building a custom PC requires various kinds of knowledge, but some may buy parts impulsively without realizing this, or are too eager to assemble quickly. In many cases, assembly would have been possible with proper knowledge.
From my first experience building a custom PC:
(If proper knowledge is acquired,) building a custom PC was not as hard as expected, but calling it easy is an exaggeration.
That was my impression.
With the major premise of having proper knowledge, it is not as difficult as one might fear, and even if mistakes are made, recovery is possible.
However, saying it is too easy may be an overstatement.
If it is the fifth custom PC, the process can be done quickly, but for the first time, there is a lot to consider, so it is not simple.
When I first built a custom PC, I thought handling multiple precision devices (PC parts) would mean a small mistake could break something and make assembly very difficult, so I felt the hurdle was high.
Moreover, since each part costs tens of thousands of yen, I really did not want to fail, making it even more stressful.
In reality, assembly was surprisingly easy without any failures, and basically, parts only fit where they are supposed to, so there is little room for error.
Also, since screws are needed to attach the PC case lid, motherboard, and storage, as long as a screwdriver can be used, it is not that difficult.
Considering the whole process from part selection to setup, there are absolutely critical points and somewhat difficult steps, which made it feel a bit challenging.
However, as mentioned earlier, these can be handled with knowledge, so researching in advance solves the problem.
The Process and Difficult Points of Building a Custom PC
There are several difficult points in the process of building a custom PC, but first, here is the overall flow for building one.
Detailed explanations of each step are available here.
≫ Related article: Overview and Time Estimates for Building a Custom PC
Among these, selecting parts, wiring, and operation checks are the most difficult, so let’s look at them in detail.
Personally, assembly is not that difficult if previewed with videos and other resources.
The Difficulty of Part Selection
Part selection is the most difficult step in building a custom PC, requiring consideration of compatibility, necessary performance for intended use, budget, design, and more.
If standards or versions are mistaken, parts may not physically fit or may not work.
Also, if the required specs for intended use are misjudged, the PC may lag or not work at all.
Ensuring compatibility and necessary performance for intended use is essential, so knowledge of parts is quite important.
How to evaluate each part’s performance and assembly knowledge is summarized in the PC Parts List.
There is also a custom PC tool developed for “estimation,” “compatibility check,” and “power calculation” just by selecting PC parts, so please use it.
≫ Tool: Custom PC Parts Estimation & Compatibility Check Tool
There are many custom PC assembly videos on YouTube, so watching them in advance is recommended.
When I first built a custom PC, I learned about parts online and referred to custom PC magazines for assembly methods.
Also, thinking alone can sometimes lead to dead ends.
For example, after researching, it may still be unclear whether the chosen parts configuration will provide comfortable performance for the intended use.
There are limits to what can be solved alone, and anxiety may remain, so asking friends or professionals knowledgeable about custom PCs is recommended.
Going to stores like PC Kobo, Dospara, or Tsukumo that sell PC parts and asking the staff (custom PC professionals) is the quickest way.
 Ken
Ken
In fact, I was in that situation for my first custom PC, and no matter how much I thought, I couldn’t shake off worries about compatibility and performance, so I felt there was a limit to thinking alone.
So, if that happens, decide on a parts configuration yourself first, then go ask for advice.
Budget is also a standard when getting advice from staff, so decide on a budget as well.
I went to Dospara to check if the performance was sufficient for my intended use, and they also checked compatibility.
All my worries were solved instantly, so I highly recommend it.
Even beginners are treated kindly, and advice is given according to one’s understanding of PC parts, so it is reassuring.
Also, in stores, there are sometimes bundle discounts for CPU and motherboard, making it cheaper.
Wiring Organization
Wiring includes cables for supplying power from the power supply unit to each PC part and data cables for storage devices.
Properly organizing wiring improves airflow and increases PC cooling efficiency.
It also makes future maintenance and upgrades easier.
Isn’t wiring just connecting cables?
Why does it take so much time?
Some may think this.
There are simply many cables, and if choosing PC case fans or CPU coolers with LEDs, the number of cables increases and becomes more complex.
Thoughts like “Which route will make the cables look better?” or “Should this cable go under that one?” also come up.
Additionally, the following points need attention:
- Wiring should not interfere with case fans or other parts
- Do not pinch or bend cables excessively
Using cable ties or fixing cables to the PC case frame helps prevent interference and keeps the inside tidy.
Also, putting too much force on cables can cause damage or disconnection.
Adjusting these things may require plugging and unplugging a cable several times, taking quite a bit of time.
![]() Ken
Ken
Troubleshooting During Operation Check
After assembly, press the power button to check operation.
If the fans start spinning, LEDs light up, and the screen displays correctly, there is no problem.
Proceed to BIOS settings and OS installation setup.
However, if the PC does not start properly, the cause must be investigated and addressed.
Some issues are solved quickly, but sometimes it takes 1-2 hours to resolve a deep problem.
![]() Ken
Ken
Problems can include the PC not responding at all when the power is pressed, or the power turning on but no display output, among other situations.
Investigate possible causes according to the situation and double-check the assembly.
That said, careless mistakes like forgetting to plug in a cable, plugging into the wrong place, memory not fully inserted, or connecting the power button cable incorrectly are common, so check these first.
Is it really possible to forget to plug in a cable?
Some may think this, but it is surprisingly common, and I also lost time due to this mistake on my first custom PC.
Thinking “I couldn’t possibly make that mistake…” leads to skipping checks and late discovery.
Basically, when building a custom PC for the first time, expect at least one or two causes for it not working.
If there are no careless mistakes, and it comes down to possible part damage or initial defects, it is necessary to narrow down which part is faulty.
In such cases:
- Try running with only one of two memory sticks.
- Temporarily remove storage devices and try running.
- Check operation with the minimum configuration (CPU, one memory stick, motherboard, power supply unit)
Check each one step by step.
If problems persist even with the minimum configuration, it is difficult to narrow down further.
However, try to confirm which parts are okay and which are suspicious as much as possible.
Also, researching online based on the symptoms is important.
When the PC does not work during operation check, patience and time are required, so if lacking patience and time for this, custom PC building may be tough.
Not being able to handle it with current knowledge does not mean being unsuited for custom PC building, so don’t worry.
I also did not know what kinds of problems could occur when I first tried… (laughs)
It is not about whether it can be done now, but having the patience to research online or think through the problem if the PC does not work.
[Irreversible] Failure Points in Custom PC Building
There are certain mistakes in custom PC building that must absolutely be avoided, as they are irreversible.
Strictly speaking, buying new parts can recover from these, but depending on the parts and number, it can cost tens of thousands of yen, so these are failures to avoid.
- Buying Parts with Incompatible Standards Like CPU Sockets
- Parts Not Fitting in the PC Case Due to Size Mistakes
- BIOS Version Incompatibility
- Insufficient Power Cable Length or Quantity
- Damaging Parts During Assembly
- Damaging Parts with Static Electricity
- Bending CPU or CPU Socket Pins
- Forgetting to Remove Protective Film from CPU Cooler, GPU, or M.2 SSD Heatsink
Buying Parts with Incompatible Standards Like CPU Sockets
PC parts have standards and compatibility, and mistakes here make assembly impossible.
For example:
- The CPU and motherboard socket types must match.
- The memory and motherboard memory slot standards must match.
- The motherboard must be compatible with the PC case standard.
The part of the motherboard where the CPU is placed is called the socket, and the socket shape changes depending on the CPU manufacturer (Intel/AMD) and even every 2-3 generations within the same manufacturer.
Therefore, if a motherboard with a socket type that does not match the CPU is chosen, assembly is physically impossible due to the different shapes.
As such, custom PCs have compatibility standards for each part, so not all parts can be assembled together.
Mistakes here mean repurchasing, so compatibility checks are essential when buying parts.
≫ Related article: Custom PC Parts Estimation & Configuration Check Tool
Parts Not Fitting in the PC Case Due to Size Mistakes
Depending on the size of the CPU cooler, graphics card, or power supply unit, they may not fit in the PC case, so size checks are necessary.
PC case product pages list the maximum supported sizes for CPU cooler height, graphics card length, and power supply unit depth.
Check these sizes against the three parts to ensure they fit in the PC case.
High-performance CPU coolers and graphics cards tend to be larger, so be careful when using smaller PC cases.
If the PC case size is not checked before purchase, parts may not fit during assembly, and in the worst case, new parts may need to be bought.
BIOS Version Incompatibility
BIOS is the system that runs first when a PC starts and is built into the motherboard.
If the BIOS version does not match the CPU or other parts, the PC may not start properly.
Especially when trying to use a new generation CPU on an older motherboard, a BIOS update may be required.
Usually, the same socket shape is used for 2-3 generations, but even if the shape matches, if the BIOS version is not compatible, the PC will not start.
Updating the BIOS requires a CPU compatible with that BIOS (i.e., a previous generation CPU), which is difficult.
It would mean buying both the desired CPU and a previous generation CPU for the BIOS update, which is not desirable.
Some relatively expensive motherboards have a function to update the BIOS without a CPU.
After a new CPU is released, motherboard manufacturers often sell them with updated BIOS, so usually there is no problem.
However, depending on the timing of the new CPU release and store inventory (older stock remaining), the BIOS may not be updated, requiring a manual update.
Therefore, before purchasing parts, check the supported CPU list on the motherboard’s official site or confirm with the store whether the BIOS is updated.
Insufficient Power Cable Length or Quantity
Each power supply unit has different cable types, numbers, and lengths, but if cables are insufficient or too short, assembly is impossible.
For general configurations, most power supplies are sufficient, but check the cable types and numbers in advance.
As for cable length, it is best to choose cables with extra length, but it is difficult to know the exact length needed at the part selection stage.
If the length is insufficient, extension cables can be used.
If cable types or numbers are insufficient, conversion or splitter cables can be used.
Damaging Parts During Assembly
PC parts are precision devices and must be handled carefully.
Rough handling, bumping, or dropping can damage parts.
Especially when installing the CPU, be careful not to bend the pins.
Motherboards, memory, and graphics cards should also be set in the correct position without excessive force.
However, installing memory or the CPU lever requires more force than expected, so some strength is needed.
Damaging Parts with Static Electricity
Static electricity can occur unnoticed in daily life, and even small discharges can damage PC parts.
Before assembly, touch metal objects like doorknobs or use discharge sheets to release static electricity.
Bending CPU or CPU Socket Pins
If CPU or CPU socket pins are bent, they are basically irreparable, so the CPU or motherboard must be repurchased. Be careful during work.
*CPU pins are on the motherboard for Intel CPUs and on the CPU for AMD CPUs.
CPU and motherboard pins are delicate, so applying too much force or installing in the wrong direction can bend them.
Some people use special tools to carefully fix bent pins, but it is not recommended for beginners, and even after building five PCs, I would not try it.
Beginners should thoroughly learn the correct method before installing the CPU and avoid applying unnecessary force.
Forgetting to Remove Protective Film from CPU Cooler, GPU, or M.2 SSD Heatsink
Depending on the part, CPU coolers, graphics cards, and M.2 SSD heatsinks may have protective film.
If this film is not removed, heat dissipation may not work properly, or the film may melt and cause failure.
Therefore, when assembling, carefully check each part’s surface and remove any film.
[Reversible] Failure Points in Custom PC Building
So far, the failures discussed required buying new parts to recover. Here, failures that can be recovered by reassembling, resetting, or buying small supplementary parts without repurchasing main parts are explained.
These failures and how to deal with them are explained in detail below.
Insufficient Memory Insertion
Insufficient memory insertion is a common mistake when building a custom PC.
Inserting memory requires some force, and if not done properly, the memory is not fully seated.
In this state, the PC will not start, but it will not break immediately.
When inserting memory, push until the clips at both ends (or one end, depending on the part) make a clicking sound.
If this sound is not heard, the memory is likely not fully inserted.
Also, inserting memory at an angle can cause poor contact, so insert it straight.
If the PC does not display anything when started, suspect insufficient memory insertion and check again.
Incorrect Memory Slot Placement
When a motherboard has four memory slots and two memory sticks are used, performance may change depending on which slots are used.
Incorrect placement does not prevent startup, but affects performance.
Memory has a dual-channel function that allows faster data transfer when used in pairs.
Triple-channel (three sticks) and quad-channel (four sticks) exist, but dual-channel is most common.
To use in pairs, insert into the designated memory slots on the motherboard.
Small labels like “A_1,” “A_2,” “B_1,” and “B_2” are written on the motherboard, and memory should be inserted according to these combinations.
Check the motherboard manual for details, as it varies by product.
Injuring Hands When Installing the PC Case Back Panel
When installing the back panel (the frame for USB ports, etc. on the rear of the case), the sharp metal and difficulty of installation can cause hand injuries.
Beginners, in particular, may not be used to handling parts and risk cutting their hands on sharp metal edges.
![]() Ken
Ken
To reduce risk, press the back panel with the handle of a screwdriver instead of your hand, or wear gloves.
Incorrect Fan Orientation
If fans are installed in the wrong direction, the airflow inside the PC will be poor, reducing cooling efficiency.
Therefore, pay attention to fan orientation when assembling a custom PC.
Especially for CPU coolers and PC case fans, which must be installed manually.
The airflow direction is indicated on the side of the fan, so refer to that.
If not indicated, check the airflow by hand during operation check.
The typical airflow in a PC is intake from the front and exhaust from the rear or top.
Install the CPU cooler and case fans according to this flow.
If installed incorrectly, air may not be taken in or hot air may not be exhausted, reducing performance.
![]() Ken
Ken
Wiring Mistakes
The most common mistake for beginners is cable connection errors.
Even after building several custom PCs, these mistakes can still happen.
Checking which cables are not connected takes time, but it is a recoverable mistake.
During assembly, there are many things to pay attention to, so it is easy to forget something.
Especially check the power cables to the motherboard and SATA cables to storage devices.
Small connectors for fans and LED lights are also easy to overlook.
![]() Ken
Ken
Receiving a Defective Part
There is a chance of receiving a defective part by bad luck.
This can happen to both beginners and experienced builders.
![]() Ken
Ken
The important thing is to know how to deal with initial defects.
If a part does not work properly, contact the store or manufacturer for support and use the warranty for exchange or repair.
Warranty usually applies soon after purchase, so contact them quickly.
Installing the OS on the Wrong Drive
First-time builders or those with multiple storage devices may install the OS on the wrong drive.
Choose the installation drive based on the model number or capacity, so be sure to know the model number of the intended drive.
Be careful, as model numbers can be similar for the same manufacturer.
Basically, the OS should be installed on a fast storage device like an M.2 SSD or SATA SSD.
It is rare to install on a slow HDD these days, so use the SSD.
If the wrong drive is chosen, reinstalling the OS can fix it.
Data on the wrong drive can usually be deleted by formatting, but back up important data first.
Using the Motherboard Video Output When a GPU Is Installed
If a graphics card is installed but the motherboard’s video output is used, the graphics card’s performance is not utilized.
For example, even if a graphics card is installed for smooth 3D gaming, using the motherboard output will result in lag.
Therefore, connect the monitor cable to the graphics card output, not the motherboard.
Tips to Avoid Failure When Building a Custom PC
Here are tips for first-time custom PC builders to avoid failure.
Thoroughly Learn About Parts and Assembly Procedures
When building a custom PC, it is important to thoroughly understand how to choose parts and the assembly process.
If this is neglected and started impulsively, minor mistakes may be fixable, but failures requiring repurchasing parts can increase costs.
This blog provides information on how to choose parts and tools to easily check compatibility, so please refer to them.
Consider Parts Warranty If Worried About Assembly
If worried about “accidentally breaking parts during assembly,” consider using a parts warranty.
For such cases, use [asp_text maker=”Dospara” text=”PC Warranty” url=”https://www.dospara.co.jp/5info/cts_parts_insurance_cart?waad=hX0TUucV”].
Normal part warranties cover initial defects and natural failures, but not self-inflicted damage.
However, for an extra fee, warranties covering self-inflicted damage are available, so consider joining such plans.
For each part, a few percent of the part price is added, and the following cases are covered:
- Accidentally broke a part during assembly
- Part was damaged by static electricity
When I first built a custom PC, I bought parts at Dospara and got this warranty.
Fortunately, I did not need to use the warranty, but being able to assemble with the mindset of “it’s okay even if something breaks!” was reassuring.
Also, it is important to understand the warranty details.
For example, check if self-inflicted damage is covered and the warranty period.
If worried about assembly, buying at a shop with a warranty system allows for a more secure custom PC experience.
Patiently Research When Unsure or When Problems Occur
When unsure about assembly or if problems occur during operation check, patience in researching is necessary.
Unexpected troubles can occur during custom PC assembly, and the types of trouble vary.
For example, after assembly, if the screen does not turn on at all when powering on, one may panic thinking, “Did I just waste 200,000 yen?”
At such times, patiently investigate the cause one by one without panicking.
In reality, most issues are simple mistakes like unconnected cables or insufficient memory insertion.
With experience, these are quickly resolved, but for first-timers, it is hard to guess which part is suspicious, so it takes time to investigate and review each step.
By patiently gathering information and acquiring accurate knowledge, it is possible to overcome custom PC troubles and gain deeper understanding and skills.
Summary: Beginners Can Do It If They Study Well in Advance!
This article explained whether building a custom PC is difficult and where failure points are, including personal experience.
Regarding whether building a custom PC is easy or difficult, my impression after assembling one for the first time is as follows:
(If proper knowledge is acquired,) building a custom PC was not as hard as expected, but calling it easy is an exaggeration.
Ken
Here is a summary of the key points:
- Building a custom PC can fail without prior knowledge
- Failure may lead to being unable to assemble or extra costs for repurchasing parts
- With correct knowledge, it is not especially difficult
- Parts selection, wiring, and troubleshooting are challenging in custom PC building
- At the very least, know the “irreversible” failure points
The assembly itself is surprisingly easy, as PC parts only fit where they are supposed to.
However, part selection, cable wiring, operation checks, and especially troubleshooting are challenging.
Mistakes in CPU socket type or memory standard must be avoided, so be sure to check these.
If a mistake is made in purchasing, exchanges are generally not accepted, so repurchasing is necessary.
Even a single part can cost several thousand to tens of thousands of yen, so check carefully.
Listing various difficult and failure-prone points may make some people more anxious, but with correct knowledge, proper assembly is possible.
Building a custom PC for the first time may be worrying, but it is definitely fun, so please give it a try.
Select PC parts and online stores to instantly generate an estimate, check compatibility, and calculate power requirements. You can save up to five different builds, making it easy to try out multiple configurations.
≫ Tool:PC Parts Estimation & Compatibility Check Tool