
Memory timing is an indicator that shows the delay and response time when memory reads and writes data.
This article explains the basic knowledge of memory timing, how it affects computer performance, how to check memory timing, and how to set it up.
However, when choosing memory, it is not common to select based on memory timing performance. For building a custom PC, it is enough to know only the most important points.
Still, for those who want to deepen their knowledge about memory, reading this article will be beneficial.
- Memory timing is an indicator of the delay and response time when memory reads and writes data
- It can be said that memory timing has little effect on performance.
- The main criteria for choosing memory are capacity and whether it can be set up in dual channel.
- Memory timing of a PC can be checked with “Speccy”.
- When setting memory timing, use the XMP profile.
This article also explains how to choose memory from the perspectives of basic knowledge, performance, and compatibility.
≫ Related article: How to Choose Memory for a Custom PC [Performance / Features / Compatibility]
Select PC parts and online stores to instantly generate an estimate, check compatibility, and calculate power requirements. You can save up to five different builds, making it easy to try out multiple configurations.
≫ Tool:PC Parts Estimation & Compatibility Check Tool
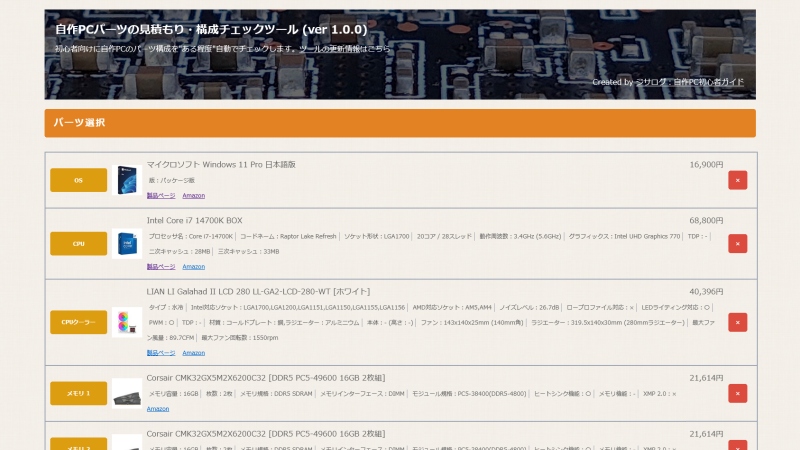
Table of Contents
What is Memory Timing?
This section explains the basics of memory timing.
Shows Delay and Response Time When Reading and Writing Data
Memory timing is a measure of the delay and response time when memory reads and writes data.
The shorter these timings are, the faster data can be read and written, which improves overall system performance.
Memory timing includes the following four values:
- CAS Latency (CL)
- tRCD (Row Column Delay)
- tRP (Row Precharge Time)
- tRAS (Row Active Time)
The lower these values are, the faster the memory responds.
Each item will be explained later.
No Need to Worry About Memory Timing When Choosing Memory [Capacity is Most Important]
From the perspective of the entire computer, the impact of memory timing on performance is very small, so it is not a major factor when choosing memory.
As explained in How to Choose Memory, the most important factor is capacity.
Next, if possible, check if it can be set up in dual channel, and if there is room, look at the data transfer speed a little.
The author has built several custom PCs, but has never used anything other than capacity and dual channel configuration as criteria for choosing memory.
≫ Related article: How to Choose Memory for a Custom PC [Performance / Features / Compatibility]
Impact on Performance
Memory timing includes the time it takes for memory to read data and the wait time until the next data can be read.
The faster the memory timing, the faster applications start and data is processed, so it does affect system performance.
So, how much impact does it have?
In conclusion, honestly, it is almost unnoticeable in actual use, and it does not always improve performance.
It is only noticeable when comparing benchmark scores.
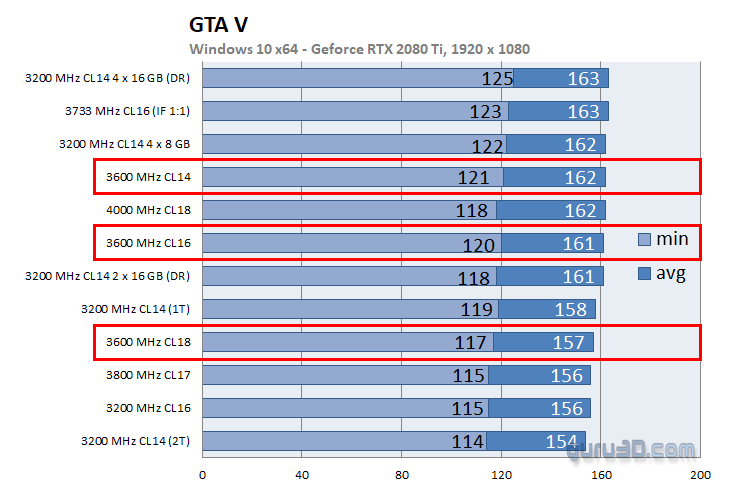
Although this is data from a while ago, there is an article that tested different types of memory with an AMD Ryzen CPU in various games.
It does not directly compare memory timing, but since the clock frequency is the same and only the memory timing is different, it can be compared.
Such subtle performance differences tend to appear during heavy workloads, but even in demanding 3D games, the difference is only about 5 FPS.
Originally, in a game that averages about 160 FPS, a 5 FPS difference is not noticeable.
Also, unless someone is a professional gamer, it is hard to say that general users need to pursue this level of detail.
There are also tests with the Final Fantasy 15 benchmark, but there was no change (within the margin of error).
Even for heavy use, the difference is this small, so for everyday or business use, the difference is almost nonexistent.
Memory Timing Items and Abbreviations
This section explains each item of memory timing and how to read (or abbreviate) them.
CAS Latency (Column Address Strobe Latency / CL)
CAS Latency shows the number of clock cycles from sending a memory command until the first data becomes available.
For example, if CL is 16, it means data becomes available after 16 clock cycles.
The actual time must be calculated using the memory’s clock frequency.
For example, if the memory operates at 3200MHz, one clock cycle is about 0.3125 nanoseconds.
Therefore, if CAS Latency is 16 clock cycles, the actual time is 16 × 0.3125 = 5 nanoseconds.
Also, newer memory standards tend to have higher latency, which may seem slower at first glance.
However, newer standards have higher clock frequencies, so the actual time to return data is shorter.
tRCD (Row Address to Column Delay)
tRCD (Row Address to Column Delay) shows the time from selecting the row address to selecting the column address.
In other words, it is the time for the memory controller to access the data to be read or written.
*The data to be referenced in memory is determined by two addresses: row address and column address.
tRP (Row Precharge Time)
tRP (Row Precharge Time) shows the time needed to close the current row address and open the next row address in memory.
In other words, it is the time to change the row address being referenced in memory.
tRAS (Row Active Time)
tRAS (Row Active Time) shows the time from when the row address becomes active until data access is possible.
How to Abbreviate Memory Timing
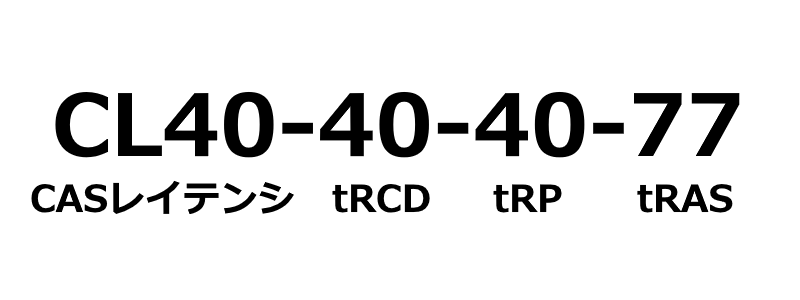
Memory timing consists of four indicators and numbers, and is usually written as follows:
CL19-19-19-43
*The numbers from left to right mean CL, tRCD, tRP, tRAS.
However, when looking at memory timing in product specifications, sometimes there are only three or one number.
This section explains what these numbers mean and how they are abbreviated.
CL19-19-19-43 (CL, tRCD, tRP, tRAS)
First is the basic form with four numbers listed for memory timing.
As mentioned above, the numbers from left to right represent CL, tRCD, tRP, and tRAS.
Also, it may be written as “32-38-38-78” with CL omitted.
CL38-38-38 (CL, tRCD, tRP)
Next is the notation with only three numbers.
In this pattern, tRAS is omitted, and from the left, it represents CL, tRCD, and tRP.
CL36 (CL)
Next is the notation with only one number, representing CL.
Also, it may be written as just “36” with only one number.
How to Check and Confirm Memory Timing
This section explains how to check memory timing.
How to Check the Memory Installed in a PC
To check the cache memory of the CPU used in a PC, use software that can display hardware information.
There are various options such as Task Manager, CPU-Z, and Speccy, but memory timing can be checked with Speccy among these.
Note that Task Manager does not display memory timing, and CPU-Z has the item but it may be grayed out and not displayed, depending on the memory.
With Speccy
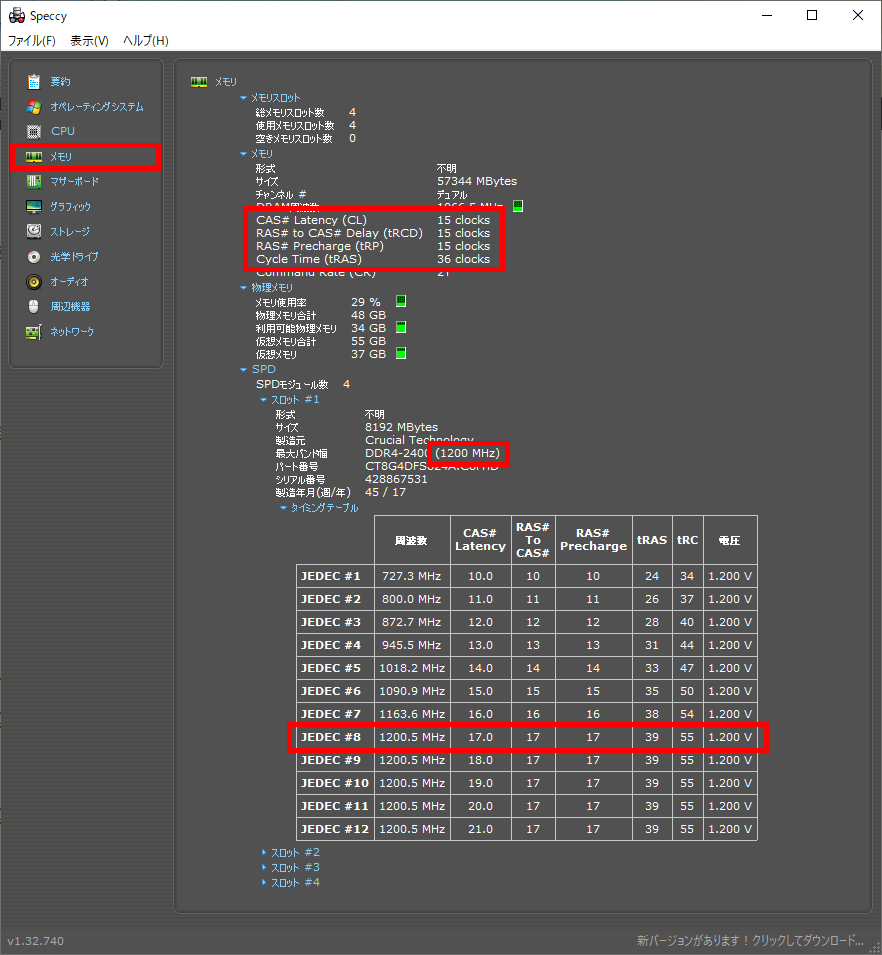
With Speccy, the memory timing is listed in the [Memory] section of the left menu.
Also, under “Slot #1” and so on, each memory module can be checked individually.
The author uses memory modules with different specifications, but it seems that the value displayed in the memory section is the smallest value among them.
Check from Memory Specifications
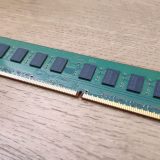
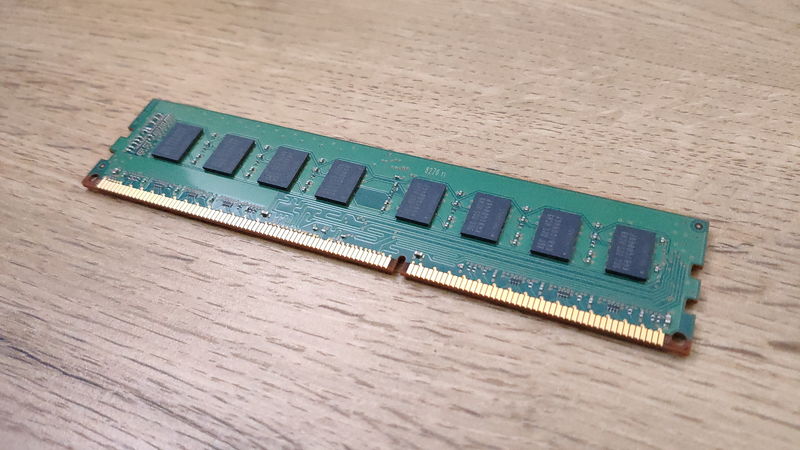
If you want to check memory timing when choosing memory, not for your own PC, check the product specifications.
Here are some examples of memory modules.
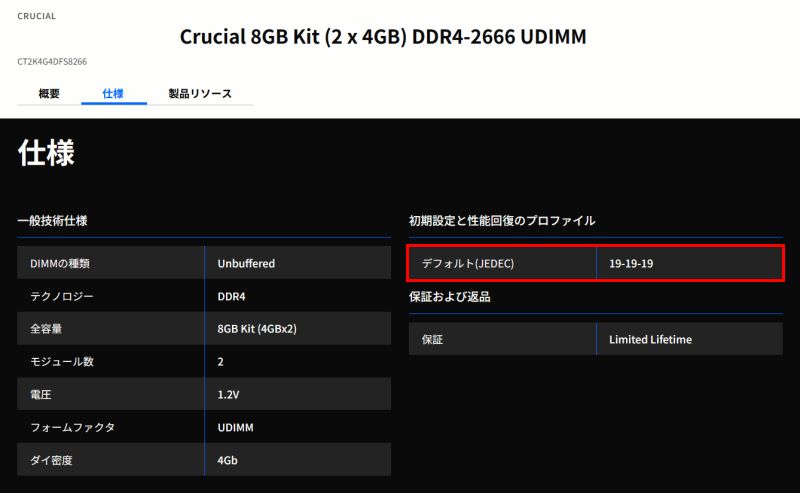
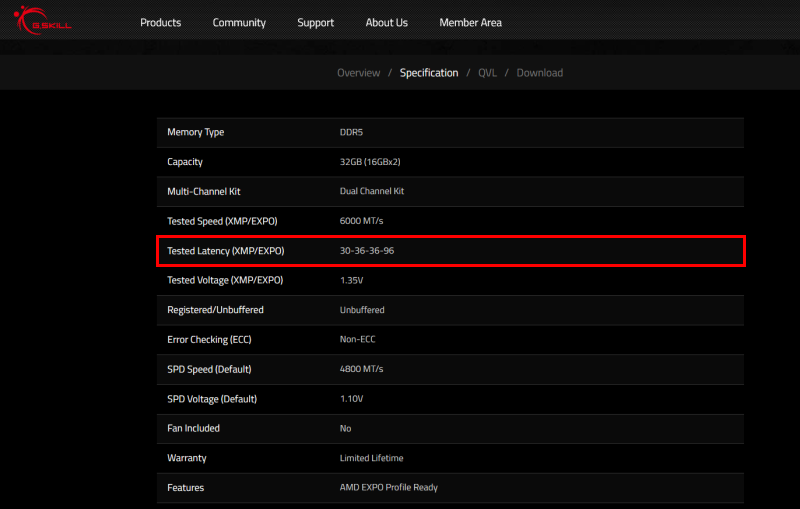
In both cases, the item is not labeled as “memory timing,” so it may be a little hard to find, but if there are three or four numbers in a row, or even one number with “CL,” it should be clear which item it is.
Sometimes it is listed with four numbers, but it is just as common to see one or three numbers.
A tool has been developed that allows “estimation,” “compatibility check,” and “power calculation” just by selecting PC parts, and it can also check memory specifications, so please make use of it.
≫ Related tool: Custom PC Parts Estimation and Compatibility Check Tool
How to Set Memory Timing
This section explains how to set memory timing.
The BIOS procedure varies depending on the manufacturer and product, so here is a general flow.
Step 1: Access BIOS/UEFI
Accessing the BIOS/UEFI prepares the system to change memory timing settings.
First, restart the computer and press a specific key (usually the Delete key or F2 key) during startup to enter the BIOS or UEFI.
This specific key varies by manufacturer and motherboard.
For details, refer to the product manual or the key displayed at the bottom of the BIOS screen when the PC starts up.
However, since it is displayed only for a moment, it may be better to take a picture with a camera and check it carefully later.
Step 2: Select Memory Settings
When the BIOS/UEFI screen appears, look for the memory settings section.
These items are usually under the “Advanced” or “Overclocking” tab.
Once the memory settings section is found, select it to proceed to the detailed settings screen.
Step 3: XMP Profile or Manual Input
There are two ways to set memory timing: using the XMP profile or entering values manually.
The XMP profile is a function that automatically sets the optimal timing based on the settings stored in the memory module.
This allows even beginners to easily set appropriate memory timing.
By simply selecting the XMP profile in the BIOS or UEFI settings screen, high-performance settings can be applied without hassle.
On the other hand, manual input allows the user to set each timing value individually.
This requires some knowledge, but allows for fine-tuning, which is useful for specific purposes or pursuing performance.
When setting manually, it is important to refer to the memory module’s specification sheet or the manufacturer’s recommended settings.
The XMP profile is an easy and reliable method, but manual input allows for more detailed adjustments.
Which method to choose depends on the user’s skill level and desired performance.
Step 4: Save Settings and Restart
Saving the settings and restarting will apply the changes to memory timing.
First, save the memory timing settings made in the BIOS or UEFI setup screen.
Usually, the option to save settings is displayed as “Save & Exit” or “Save and Exit.”
Selecting this option will automatically restart the system.
After restarting, access the BIOS or UEFI again to check if the memory timing values are correctly applied.
This completes the setup.
Summary: Memory Timing is Not a Major Factor When Choosing Memory for a Custom PC
This article explained the basic knowledge of memory timing, its effect on performance, how to check memory timing, and how to set it up.
Once again, here are the key points about memory timing.
- Memory timing is an indicator of the delay and response time when memory reads and writes data
- It can be said that memory timing has little effect on performance.
- The main criteria for choosing memory are capacity and whether it can be set up in dual channel.
- Memory timing of a PC can be checked with “Speccy”.
- When setting memory timing, use the XMP profile.
When it comes to performance, there may be a slight improvement, but it is not noticeable in actual use, and even when measured with benchmarks, the increase is only slight and not dramatic.
Therefore, there is no need to worry about memory timing as a criterion when choosing memory. The important points are memory capacity and whether it can be set up in dual channel.
This article also explains how to choose memory from the perspectives of basic knowledge, performance, and compatibility.
≫ Related article: How to Choose Memory for a Custom PC [Performance / Features / Compatibility]
Select PC parts and online stores to instantly generate an estimate, check compatibility, and calculate power requirements. You can save up to five different builds, making it easy to try out multiple configurations.
≫ Tool:PC Parts Estimation & Compatibility Check Tool