
CPU thermal paste is an essential component for maximizing the cooling performance of a DIY PC.
When you first assemble, an appropriate amount of grease is applied to the CPU cooler side, but if you fail to install the CPU cooler or you need to reapply the grease for maintenance, you will have to purchase a separate CPU grease and apply it yourself.
If you apply the wrong coating, it will reduce cooling performance and lead to poor performance.
This article provides a detailed explanation of the role of CPU thermal paste, its aging process, and basic knowledge, along with application methods to prepare for future reapplications.
- The role of CPU thermal paste is to efficiently transfer heat from the CPU to the CPU cooler
- Thermal Paste is generally pre-applied on the CPU cooler for first-time installation
- If CPU cooler installation fails, separate thermal paste must be purchased
- Since thermal paste deteriorates over time, reapplication about once every three years is ideal
Basic knowledge such as how to identify CPU manufacturers and model numbers, performance indicators, and guidance on selecting CPUs based on performance and compatibility is also explained.
≫ Related article: How to Choose a CPU for a DIY PC [Performance / Features / Compatibility]
Select PC parts and online stores to instantly generate an estimate, check compatibility, and calculate power requirements. You can save up to five different builds, making it easy to try out multiple configurations.
≫ Tool:PC Parts Estimation & Compatibility Check Tool

Table of Contents
About CPU Thermal Paste for DIY PCs
CPU thermal paste is indispensable for efficiently transferring heat from the CPU to the CPU cooler.
For the first use, thermal paste is usually pre-applied on the cooler, but from the second time onward, separate purchase is required.
The Role and Necessity of CPU Thermal Paste
The CPU generates significant heat, often reaching 70°C to 80°C under heavy load.
To maintain stable performance, it requires cooling via a CPU cooler.
Thermal paste ensures that this heat is smoothly transferred from the CPU to the cooler.
Although the contact surface between the CPU and heatsink may look flat, in reality, microscopic gaps exist where they do not touch directly.
When air fills these gaps, cooling efficiency decreases since air is a poor conductor of heat.
By filling in these gaps, CPU thermal paste eliminates air interference and enhances thermal conductivity.
This allows heat from the CPU to be efficiently transferred to the heatsink, enabling effective cooling.
Without thermal paste, heat would not transfer adequately, leading to rising CPU temperatures, performance degradation, and potential failure.
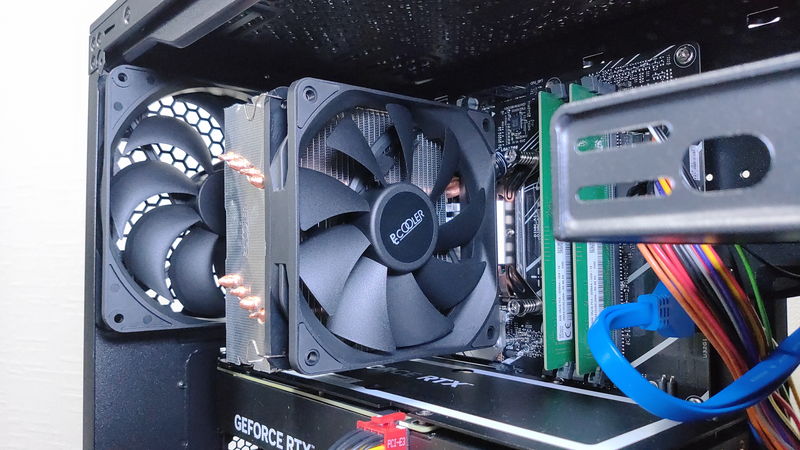
One Application Is Pre-Applied on the CPU Cooler
Many CPU coolers come with thermal paste already applied to the base plate.
Therefore, there is no need to purchase thermal paste separately for first-time installation.
When assembling for the first time, you often feel unsure about the amount of grease and how to apply it, but since it is pre-applied, this will also reduce this concern.
However, depending on the product, some coolers include a separate tube of thermal paste that needs to be applied manually.
Reapplication Requires Additional Purchase
If CPU cooler installation fails, the thermal paste becomes smeared and unusable.
Thus, when reapplying after the first attempt, additional paste must be purchased.
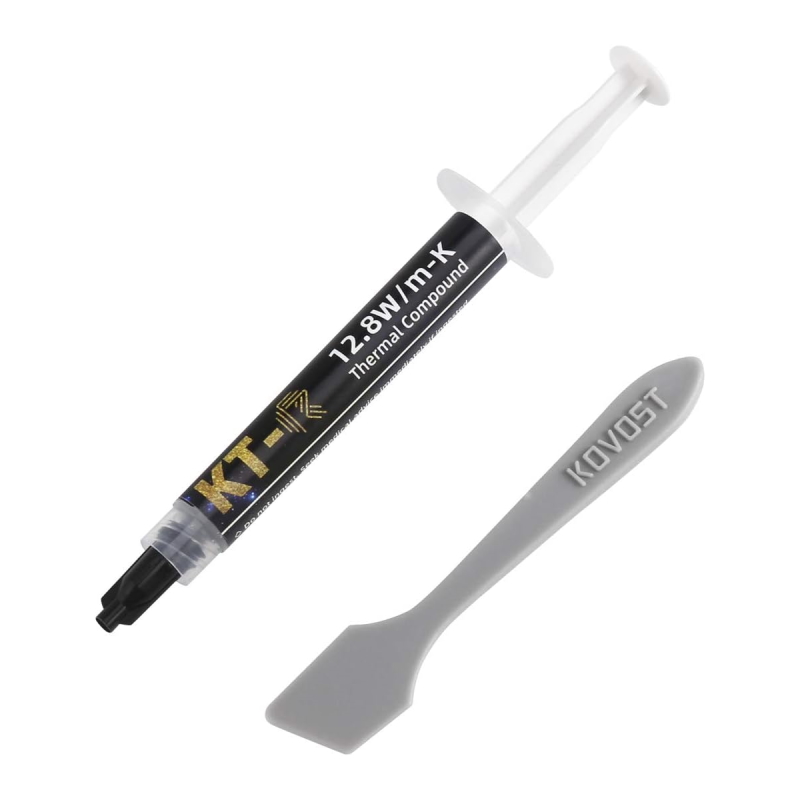
When applying manually, paste is spread onto the CPU surface before installing the CPU cooler.
Since various products are available, choosing one with higher thermal conductivity within budget is recommended.
Liquid metal pastes, however, are difficult to handle and intended for advanced users, so they should generally be avoided.
Reapplying CPU Thermal Paste
This section explains the lifespan, frequency, and necessity of reapplying CPU thermal paste.
Lifespan of Thermal Paste: About 3 Years
CPU thermal paste gradually degrades and typically has a lifespan of about three years.
The degradation rate varies depending on paste quality, PC usage hours, and CPU workload.
In some cases, if usage is light or if high-quality paste is used, it may last beyond three years.
Over time, paste dries and hardens, reducing its ability to transfer heat efficiently.
the lifespan of CPU grease, the frequency of reapplying, and the need for it.
![]() Ken
Ken
Reapply About Every 3 Years
Since the lifespan of CPU thermal paste is around three years, it becomes necessary to reapply once about three years have passed after purchasing a computer or assembling a DIY PC.
Depending on usage time and the quality of the paste, it may last longer, but confirming its actual condition requires removing the CPU cooler.
However, once the cooler is removed, adhesion is reduced, making reapplication necessary.
As a result, it is more practical to predict the lifespan and reapply the paste at regular intervals.
Therefore, it is advisable to reapply about every three years to prevent safety and performance issues.
Additionally, cleaning the inside of the PC during paste reapplication is recommended.
If dust is present, it can interfere with the work process, and if it mixes with the thermal paste, heat may not be transferred effectively to the CPU cooler, resulting in reduced performance.
Since thermal paste is designed to fill the microscopic gaps between the CPU and the cooler, any dust that enters those gaps can compromise adhesion and lower thermal conductivity.
In addition, when dust mixes with the thermal paste, it becomes difficult to spread evenly, making bubbles or uneven layers more likely to form.
As a result, insufficient cooling may occur, leading to higher CPU temperatures and potential performance degradation.
For step-by-step cleaning methods with photos, see this guide:
≫ Related article: Complete Guide to Cleaning a DIY PC with Required Tools [With Photos]
On the Necessity of Reapplication (Performance Degradation, etc.)
The aging of CPU thermal paste mainly causes the following effects.
- Drying and Hardening
As paste dries and hardens, it loses flexibility and can no longer fill the gaps between the CPU and cooler, worsening thermal conductivity.
- Cracking and Peeling
Hardened paste can crack and peel.
This prevents efficient heat transfer to the cooler and lowers cooling efficiency.
- Oil Separation
Inexpensive pastes and certain silicone-based compounds may experience oil separation, causing the oil component to leak.
Leaked oil can increase the risk of component failure in the CPU area, motherboard, or graphics card.
- Oxidation and Chemical Reactions
Metal-based, liquid metal, and some ceramic-based pastes may chemically change due to oxidation or other reactions.
Such changes reduce thermal conductivity and degrade cooling performance.
- Performance Degradation
These physical and chemical changes reduce CPU cooling performance.
As cooling performance drops, CPU temperature rises and thermal throttling can occur, preventing the maintenance of high performance under heavy load.
Drying, cracking, and other issues ultimately lead to reduced performance.
Overall thermal conductivity to the CPU cooler declines, making CPU temperatures rise more easily.
As a result, it becomes difficult to fully extract peak performance under heavy loads, and system stability may suffer.
There is also potential for shortened CPU lifespan or forced shutdowns during work.
Signs It Is Time to Reapply
The condition of CPU thermal paste cannot be visually checked because it sits between the CPU and cooler.
Therefore, the following signs can help determine when reapplication should be considered.
If any of the following symptoms appear, consider reapplying thermal paste.
- CPU temperatures are higher than before
When paste deteriorates, heat does not transfer well to the heatsink, and CPU temperature can rise by several to more than ten degrees Celsius.
If the system runs hot at all times, it is a sign of insufficient cooling. - The fan is constantly spinning at high speed
As temperature increases, the CPU fan may remain at a high RPM to compensate.
A noticeable increase in fan noise compared to before can indicate aged paste. - System behavior has become unstable
More frequent freezes or shutdowns can indicate thermal runaway (thermal shutdown).
Cooling deficiencies caused by aged paste can be one contributing factor.
Note that these symptoms do not always mean the cause is aged thermal paste.
For CPU temperature comparisons, prior baseline temperatures are needed. It is advisable to monitor and record idle and heavy-load temperatures from the early usage stage.
Even if such symptoms do not appear, proactive maintenance is recommended: as noted earlier, reapplying CPU thermal paste about once every three years is advisable.
Types of CPU Thermal Paste
CPU thermal pastes include silicone-based, silver-based, and other varieties.
Characteristics, approximate thermal conductivity, handling, and more vary by type. The following list summarizes the major categories.
| Paste Type | Characteristics | Thermal Conductivity (W/mK) | Ease of Application | Durability | Electrical Conductivity | Cost | Skill Level |
|---|---|---|---|---|---|---|---|
| Silicone Paste | Highly versatile and inexpensive, easy to obtain | 1.93 – 13 | Easy | Moderate | Non-conductive | Low | Beginner-friendly |
| Silver Paste | Contains silver; offers higher thermal conductivity | 6.5 – 13 | Slightly difficult | High | Conductive | Medium | For intermediate users |
| Ceramic Paste | Metal-free; electrically insulating and safe | 5.1 | Easy | Moderate | Non-conductive | Medium | Beginner-friendly |
| Diamond Paste | Contains diamond micro-particles with excellent thermal conductivity | 12 – 17 | Difficult | High | Non-conductive | High | For advanced users |
| Liquid Metal Paste | Extremely high thermal conductivity metal alloy; ideal for maximizing cooling performance | 73 – 128 | Very difficult | Very high | Conductive | High | For advanced users |
Thermal conductivity (W/mK) indicates how efficiently a material transfers heat: higher values mean faster heat dispersion and better cooling.
Electrical conductivity refers to a material’s ability to conduct electricity. With CPU thermal paste, conductivity is a critical factor.
If electrically conductive paste contacts the motherboard or other components, it can cause short circuits and potentially damage hardware.
Therefore, non-conductive paste is recommended for beginners or those prioritizing safety.
Pastes bundled with CPU coolers are often silicone-based.
For stable PC operation, silicone paste is typically sufficient.
Those seeking higher sustained performance through improved cooling may consider replacing silicone paste with a higher thermal conductivity option.
The following sections take a closer look at each type and its typical use cases.
Silicone Paste
Silicone paste is one of the most common and widely used CPU thermal compounds.
Its main component is silicone, and it is easy to apply, making it accessible for beginners.
Furthermore, silicone paste is non-conductive, so even if it accidentally comes into contact with the circuit board, the risk of a short circuit is low.
It provides adequate performance for everyday use, gaming, and creative workloads, though it is not ideal for aggressive overclocking or scenarios requiring the highest cooling performance.
With moderate resistance to oxidation and corrosion, it maintains stable performance over longer periods.
Because of its low cost and ease of application, it is recommended for a wide range of users, from first-time DIY PC builders to intermediate users.
Silver Paste
Silver paste contains fine silver particles.
Thanks to silver’s high thermal conductivity, it transfers heat efficiently between CPU and cooler, boosting cooling performance.
Overall thermal conductivity is typically somewhat higher than silicone paste.
It is often used to improve cooling efficiency during overclocking or heavy workloads.
However, it is electrically conductive, so great care is required to avoid contact with the motherboard or other components during application.
It is generally more expensive than silicone paste, with commensurate performance gains.
Ceramic Paste
Ceramic paste contains ceramic components such as aluminum oxide or aluminum nitride.
The number of products in this category is relatively small, so options may be limited.
Being non-conductive, it can be used safely even if it accidentally contacts other components.
Diamond Paste
Diamond paste includes diamond particles and delivers high thermal conductivity.
It excels in high-end gaming PCs and professional workstations.
Because of its higher price, it is better suited for scenarios where budget allows.
It can also be said to be a product intended for experienced users, as applying it is somewhat difficult.
Liquid Metal Paste
Liquid metal paste uses gallium, indium, and other liquid metals as the highest thermal conductivity CPU compound.
Compared with other pastes, its thermal conductivity is on a different level, allowing maximum cooling performance.
These metals are liquid at room temperature, so they are not spread like typical pastes.
Being liquid, they bead up due to surface tension; deliberate spreading is required, which makes handling difficult for those without experience.
Despite the challenge, the excellent thermal conductivity rapidly transfers heat to the cooler and achieves superior cooling.
Liquid metal paste is incompatible with aluminum parts and can cause corrosion. Compatibility of materials should be verified before use.
The base plate (the surface contacting the CPU and paste) of most CPU coolers is made of copper.
However, certain models may have portions made of aluminum; caution is advised.
This compound is intended for experienced users who prioritize maximum cooling performance.
How to Apply CPU Thermal Paste
The following outlines the general steps for applying CPU thermal paste.
During the first build, paste is pre-applied on the cooler side, so application steps are not an issue in that case.
The instructions below assume reapplication after installation failure or due to aging.
Step 1: Remove the CPU Cooler
To apply thermal paste, the CPU cooler must be removed.
The cooler is mounted on top of the CPU; removal is required to access the heat spreader where paste is applied.
Before starting, power off the PC and unplug the power cable to prevent electric shock or component damage.
Open the PC case to access the internal components.
Refer to the manual for case-specific opening procedures.
The CPU cooler is usually secured with screws or clips.
Carefully loosen these to remove the cooler.
Avoid pulling forcefully; gently wiggle the cooler to lift it off.
Depending on the build, it may be necessary to remove the motherboard from the case before cooler removal.
Step 2: Clean the CPU and CPU Cooler
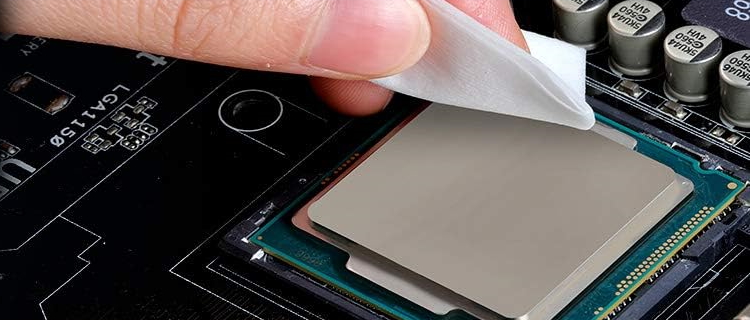
After removal, carefully wipe off old paste from the CPU and cooler contact surfaces using alcohol wipes or a dedicated cleaner.
If alcohol or cleaner is unavailable, a tissue or unused cloth can be used as a last resort.
However, complete removal may be difficult, and tissues can leave fibers that interfere with application and thermal transfer.
![]() Ken
Ken
After cleaning both the CPU and cooler, allow surfaces to fully dry before applying new paste.
Step 3: Apply Paste to the CPU
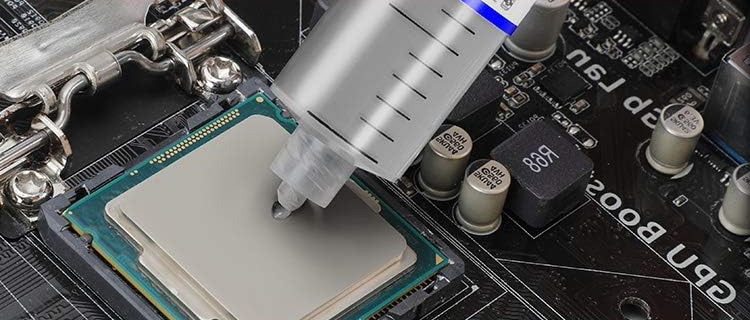
Although paste is pre-applied on the cooler for the first build, for manual reapplication, paste is applied to the CPU side.
There are various application patterns; the principle is to cover the entire surface of the heat spreader (the silver plate) as thinly as possible.
Any uncovered area on the heat spreader will not transfer heat effectively, reducing cooling performance.
In terms of thermal pathways, the heat spreader and the cooler base (both metal) conduct best, followed by thermal paste, with air being the worst conductor.
Therefore, the micro-grooves between metal surfaces should be filled to eliminate air layers, yet paste should be kept thin to transfer heat quickly into the higher-conductivity metal.
Even if paste is applied too thickly, mounting pressure will squeeze out excess paste; from a cooling perspective this is generally acceptable.
However, excess paste may dirty the CPU area or motherboard and could impact operation, so apply as thinly as practical.
If the heat spreader is faintly visible, it is too thin; aim for a thickness that just prevents the underlying metal from showing through.
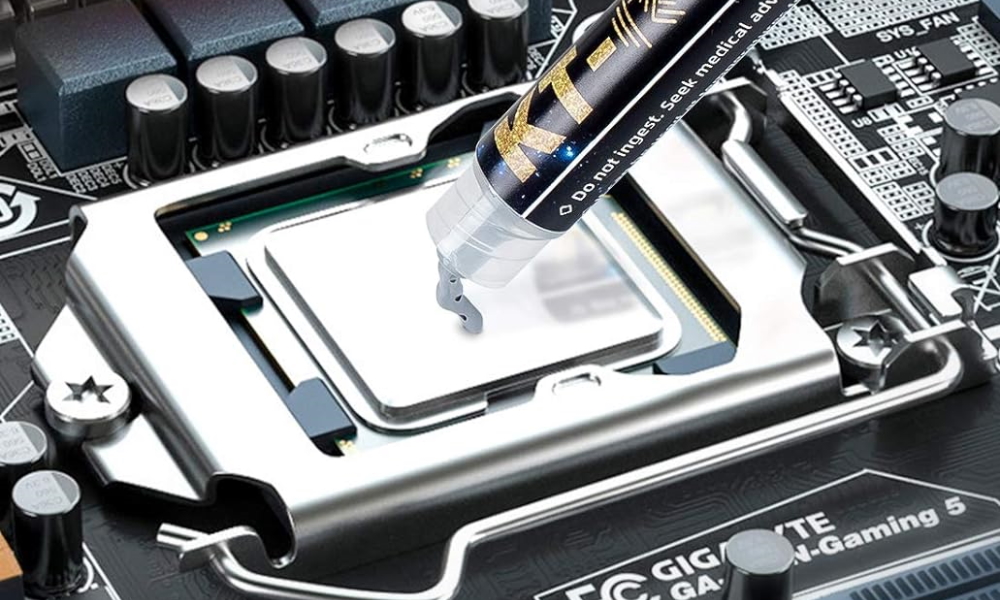
Common methods include placing a pea-sized dot in the center and relying on cooler pressure to spread the paste.
This can spread in a roughly circular pattern and may not reach the corners.
To mitigate this, some apply multiple small dots in the center and slightly inside the four corners.
![]() Ken
Ken
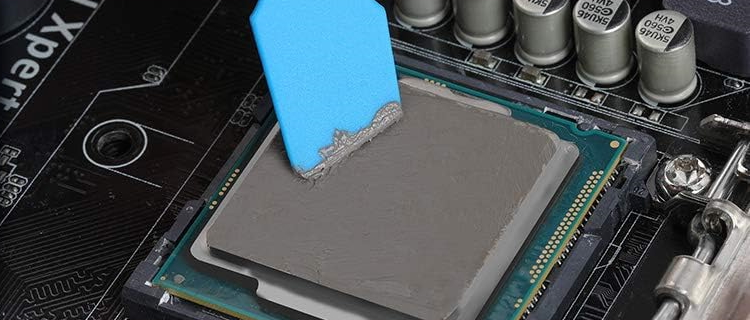
Another approach is to manually spread the paste evenly with a spatula before installing the cooler.
Both the multi-dot pressure spread and the spatula method are widely used in practice.
Step 4: Install the CPU Cooler
After applying paste, install the CPU cooler to complete the process.
Since this section assumes reapplication, detailed mounting steps are omitted here.
If relying on cooler pressure to spread paste, press straight down to apply even pressure.
When fastening, tighten screws in a crisscross pattern incrementally to help maintain even pressure.
Summary: Regular Reapplication Is Essential
CPU thermal paste plays a critical role in efficiently transferring heat from the CPU to the cooler.
Incorrect application can reduce cooling efficiency and lead to performance degradation.
Key points are summarized below.
- The role of CPU thermal paste is to efficiently transfer heat from the CPU to the CPU cooler
- Grease is generally pre-applied on the CPU cooler for first-time installation
- If CPU cooler installation fails, separate thermal paste must be purchased
- Since thermal paste deteriorates over time, reapplication about once every three years is ideal
Thermal paste is pre-applied for first-time assembly, but subsequent attempts require purchasing paste and reapplying correctly.
Because paste ages, periodic maintenance—reapplying about once every three years—is recommended.
Mastering proper application helps maximize CPU cooling performance.
Basic knowledge about CPU manufacturers and model numbers, performance indicators, and selection based on performance and compatibility is also provided.
≫ Related article: How to Choose a CPU for a DIY PC [Performance / Features / Compatibility]
Select PC parts and online stores to instantly generate an estimate, check compatibility, and calculate power requirements. You can save up to five different builds, making it easy to try out multiple configurations.
≫ Tool:PC Parts Estimation & Compatibility Check Tool